You are using an out of date browser. It may not display this or other websites correctly.
You should upgrade or use an alternative browser.
You should upgrade or use an alternative browser.
New Crack build.
- Thread starter richmi
- Start date

i luvmusic 2
New member
Not that close i'am from Ontario,Canada.
Thanks
Thanks
i luvmusic 2
New member
You could if you want ;D
i luvmusic 2,
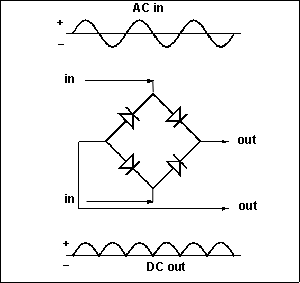
The purpose of the full wave bridge rectifier is to convert the AC into DC (see image, OUT on the left of the lozenge is ground or -, OUT on the right is +. That is also illustrated on the Crack schematic on page 7 of the manual).
If you trace the path from 20U, you will see that it then goes to 14U. 14U goes to 12U via a bridge. 12L is connected to the ground of the headphone jack that in turn is connected to the lug on the potentiometer that is closest to the 9-pin socket. That lug is also connected to 3L that is where the ground starts.
So, when you connect the rectifier board, + goes to 21L (positive) and - goes to 20L (ground). This is why the silver band on the two UF 4007 diodes going to 21L is closest to that terminal (current flows in that direction ⇥ ) and those two going to 20L have the silver band away from that terminal (current is blocked ⇤ ).
One AC on the PCB is connected to the power transformer terminal 9 and the other to 10.
I could not find nylon standoff locally either. So I found some on eBay from this vendor:
http://www.ebay.ca/itm/250954612234?ru=http%3A%2F%2Fwww.ebay.ca%2Fsch%2Fi.html%3F_from%3DR40%26_sacat%3D0%26_nkw%3D250954612234%26_rdc%3D1
Make sure you get screws too, as they may also be difficult to find locally. Longer is better than shorter; you can always trim them if needed.
I hope this helps.
Richard
Attachments
i luvmusic 2
New member
I just finished installing mine a few hours ago and after a lot of searching locally i finally found a nylon standoff M/F(8-32 1 1/2),nylon nuts(8-32)and #8 1/2" screws it's a little big but i managed to fit it,most of the smaller diameter standoff available locally are 1'' and shorter anything longer than 1" is #8 and bigger.
Thanks to you i really like what i'am hearing right now.Picture will follow i'am listening to the amp right now.
THANK YOU FOR YOUR REPLY
Thanks to you i really like what i'am hearing right now.Picture will follow i'am listening to the amp right now.
THANK YOU FOR YOUR REPLY
lth1
New member
In my Crack I just let the PCB float with the four wires, in the presently on going BeePre rebuild I used a wrap tie to attach the PCB to a 1" square wrap tie anchor, nice and neat just solder the PCB before attaching to the anchor, personally I do not like to put extra holes in the top plate.
I purchased an inexpensive powder coat gun in 2011, never used it until last week in the recent Crack and BeePree rebuilds. It really make it easier to paint the top plates and end bells. The paint is extremely durable and is IMHO easier to use than spray cans but the bottom line is a higher quality finished product. I am using an ancient toaster over to heat up the painter parts.
I purchased an inexpensive powder coat gun in 2011, never used it until last week in the recent Crack and BeePree rebuilds. It really make it easier to paint the top plates and end bells. The paint is extremely durable and is IMHO easier to use than spray cans but the bottom line is a higher quality finished product. I am using an ancient toaster over to heat up the painter parts.
i luvmusic 2
New member
Here is mine.

i luvmusic 2
New member


i luvmusic 2
New member
Since the day i installed the CREE Diodes my SEX amp is collecting Dust.

i luvmusic 2
New member
Hmmmmm never thought of that.
So which Diodes i need?Preferably from Parts Connexions so i can pick it up.
I will PM you so we don't hijack this thread.
Thanks!
So which Diodes i need?Preferably from Parts Connexions so i can pick it up.
I will PM you so we don't hijack this thread.
Thanks!
ALL212
Member
I might be mis-semi quoting but I think Grainger told me to just use 1 and it will remove the leaking reverse current. Add it in the power supply chain or even somewhere post power supply - don't even need to change the existing ones.
I did this on my Reduction. That thing has such a good power supply with Integration in it that it was not near the change as the Crack. but I think it did help a bit.
I did this on my Reduction. That thing has such a good power supply with Integration in it that it was not near the change as the Crack. but I think it did help a bit.
i luvmusic 2
New member
No worries....... ")
Grainger49
New member
Not misquoting. You can put one Cree in series with the B+ lead and filter out all reverse spike noise. That makes the tweak much easier to install.
Similar threads
- Replies
- 50
- Views
- 1K
- Replies
- 24
- Views
- 779
- Replies
- 6
- Views
- 196