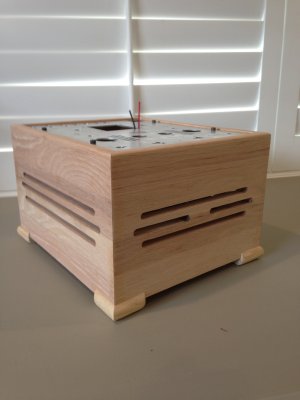
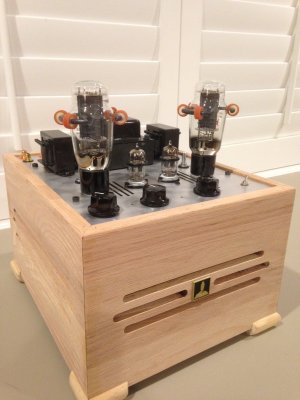
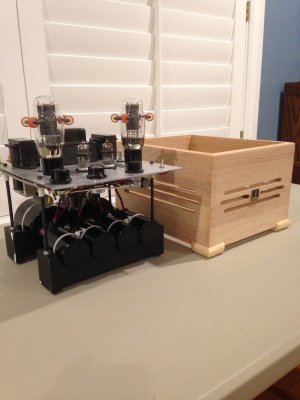
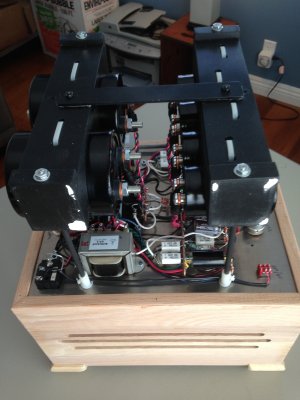
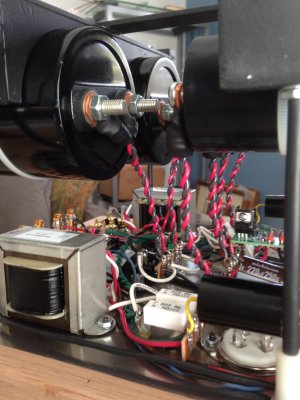
I'm building my second S II, this time with film caps in the PS. Since the films are so much larger than electrolytics, I had to build a taller base which took much longer than I had hoped.Then I built cradles for the caps which I suspended from the chassis using all-thread and nylon standoffs. As the amp nears completion I will need to connect the caps to the terminals with leads that will be about 4.5 inches long.So, my question is, should I twist the leads of each cap before connecting to the terminal or just run them directly to the terminal ( or does it matter)? I'll try to attach photos.
You are using an out of date browser. It may not display this or other websites correctly.
You should upgrade or use an alternative browser.
You should upgrade or use an alternative browser.
Stereomour II with Film Caps in PS
- Thread starter Jamier
- Start date
Paul Joppa
Moderator
Yes, I would recommend twisting the wires together. The objective is to minimize the loop area, so that local magnetic fields (from the power transformer mainly) do not induce hum currents. Twisting also reverses the direction of sensitivity with each turn, cancelling out much of the residual pickup.
Paul Joppa
Moderator
That's a reasonable goal, but not critical.
I am almost ready to voltage test the amp. I have built it in the stock configuration and included all the required tests to be certain that it functions as intended before I begin the film cap substitutions. Is it safer to replace the caps one stage at a time,beginning with the last stage and working back? I feel like this approach will have greatest chance of success. I am concerned that if I change all the caps at once there could issues at the end of the PS that might be a problem, like increased B+ Voltage. Given that the film caps should have lower ESR, is this a possibility? If so I guess I will need to increase the values of the 130 ohm resistors that seperate the caps(?).
Jamie
Jamie
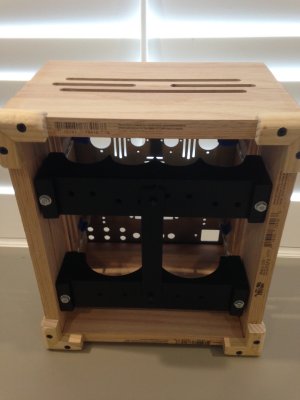
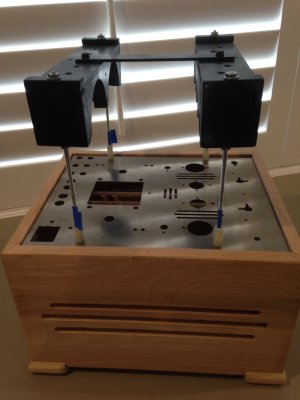
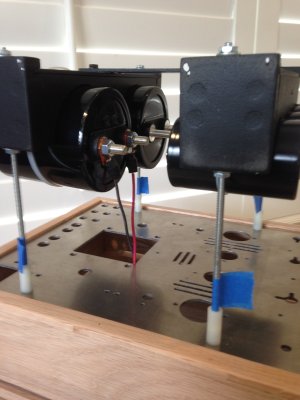
Hi Mark. This is the reason I haven't finished my F4. I'll be getting back to you for some more advice when I pick that up again. The cradles for the caps are made from 3/4 inch pine. I started by routing holes that are the same as the diameter of the caps. Then I cut those in half creating the cradles. Those half pieces are then placed back to back with about 1 inch of space between them and screwed down to a piece of 1/8 inch aluminum that has holes in it to allow zip ties to pass through it to hold the individual caps. Some end pieces of the same 3/4 inch pine completes the cradle.They hang from the chassis on All-Thread, washers and nuts. I sprayed them with rubber paint (Plastidip). It's all gotten from Home Depot (well, actually Lowes).MDF might work but the end pieces are screwed to cradles and screws just don't hold well in MDF.
")
I finished the stock build, resistance checked, voltage checked and now listening to the stock configuration. I will let this run for a 10-20 hrs to be sure there are no problems and then I will replace the last stage ( the last 100 uF caps) with Mundorf 100uF M tube caps. If that goes well I will change the second stage, listen for a while and then move on to the 220uF caps in the first stage. The second stage will also be the Mundorfs, the first stage will be replaced with Cornell-Dubilier 947C series 230uF / 1KV caps. I chose these particular capacitors for a few reasons. They meet the required specs, have good reputations and, while physically large, still fit under the new base that I built for the amp with enough clearance to remain well below the warmer components of the amp. I created adequate ventillation in the base (I hope) and suspended the new caps below this level feeling that air will enter above the caps to keep the rest of the components cool, carrying the heat out the top leaving the area around the new caps relatively cool. The replacement film caps also have screw terminals which made this process much easier with all the in and out that comes with fitting, etc. Originally the plan was to use ASC PP in oil but I could only find 50 uFs which required 8 of them. I tried several configurations but I just couldn't get them under this base with enough room to spare so I had to go with Mundorfs. So as this process moves forward I will compare each change to the stock SII that I built a few months ago and make progress reports.
Jamie
Jamie
I replaced the last stage PS caps with the Mundorfs (100uf). I got everything soldered and decided I should voltage check terminals 26,27,34 and 35. It's very tight in there when the capacitor cradles are in place. When I attempted to check 34 I must have touched 35 at the same time and.....
Well, you know what happened. The LEDs on the left channel of the C4s board are out. I am hoping that is all that is wrong. Any way I connected the amp to my system just to hear what the right channel sounds like. I only had it up for about 10 minutes before shutting it down but it seems like the amp has greater detail and a bit more bass. I'm considering taking the C4s board out of the other SII but I don't know if that is going to solve all of the problems. Does anyone have advice?
Jamie
OK, up and running. When I shorted 34 and 35 I cooked the 130 ohm resistor preceeding the last capacitor stage on the left channel. I was lucky enough to get ahold of the Queen today. She sent me a few new resistors, so I decided to take a 130 out of the other SII to continue with the cap substitutions( THANKYOU Eileen !). I now have the last two stages replaced. I have a couple hours on it now. The difference between this and the stock amp is not subtle. The detail is improved and the bass is better. It just sounds more substantial. Last night I thought It might take me weeks to get back to this point. I'll give it quite a few hours in this configuration before changing the 220s in the first stage. If one were to swap only these last two stages it would be very much worth while. It really is the 220s that require the big base and all the work that comes with that.
Jamie
Jamie
I finished the last (actually the first) stage today. I have about 4 hours on it with the 220s replaced. The improvement with this change is all about noise, that's about it. It is really quiet now, almost black. There was not the dynamic improvement that came with the first two stages though. So, to sum it up, at this point I think you get about 60 percent of the improvement with the swap of the last stage caps.The swap of the second stage gets you about 30 percent of the improvement. The last stage gets you about 10 percent, but it's the stage that requires the taller base and a lot of work.So, if you want it all take the leap and get out your power tools. If you only want most of the improvement, just build some nice, sort of tall corners for the stock base and your almost there.
Jamie
PS: Pics Attached
Jamie
PS: Pics Attached
Attachments
Similar threads
- Replies
- 6
- Views
- 4K
- Replies
- 2
- Views
- 2K
- Replies
- 22
- Views
- 66K