S.E.X. or Crack2A - which is better for learning and experimenting?

  • Thread starter Thread starter Deke609
  • Start date Start date
Yeah, true! So are you saying that the signal from both cathodes are in phase with one another, but out of phase (inverted) as compared to the original?

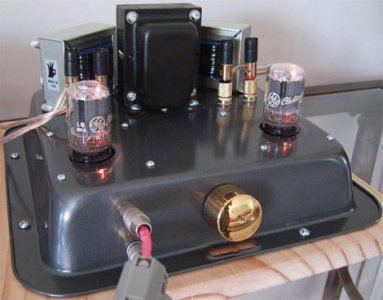
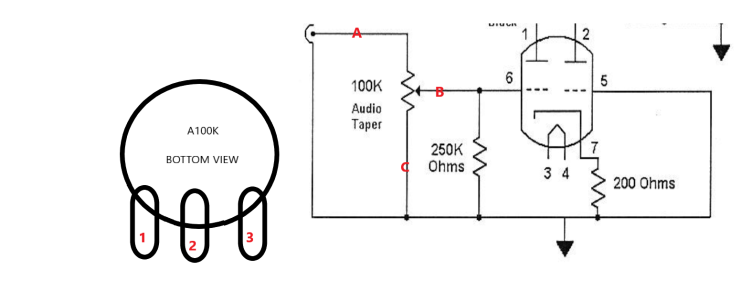
Edit: I think I see what you mean about using the differential circuit to keep the gain down. I had been thinking (without actually checking) that the 6J6 was grid-biased with -ve DC voltage, but now see that it is cathode-biased in an intentionally weird way to lower the voltage gain.  Whereas a capacitor would normally be added to bypass the cathode resistor to send AC signal on the cathode to ground, in this circuit it is intentionally left out with the result that the cathode acts as a signal source and lowers the output the tube in doing so -- I don't yet understand the "mechanics" of the power lowering effects -- but only that this is something that one usually seeks to prevent by adding a capacitor bypass. This seems a very strange amp.  Is there a sonic purpose to its design? Or was it born as a result of someone smart having a two 124bs and two 6J6s kicking around and deciding to see if they could make something work? Either way, it seems pretty unique and clever.
 
Deke609 said:
Yeah, true! So are you saying that the signal from both cathodes are in phase with one another, but out of phase (inverted) as compared to the original?
There's only one cathode in a 6J6.

Deke609 said:
I had been thinking (without actually checking) that the 6J6 was grid-biased with -ve DC voltage, but now see that it is cathode-biased in an intentionally weird way to lower the voltage gain.
It is biased with negative grid voltage.  The grid is at DC ground and the DC current of both plates flows through the bias resistor, so the cathode is at a positive DC voltage with respect to grid.

Deke609 said:
Whereas a capacitor would normally be added to bypass the cathode resistor to send AC signal on the cathode to ground, in this circuit it is intentionally left out with the result that the cathode acts as a signal source and lowers the output the tube in doing so
This is the case for the common cathode stage, but a little more complicated for the differential circuit.  If you bypass the cathode bias resistor in a differential circuit, it's no longer differential (the side with the grounded grid is no longer acting on the signal, but rather just sitting there sipping down power supply current).


Deke609 said:
-- I don't yet understand the "mechanics" of the power lowering effects -- but only that this is something that one usually seeks to prevent by adding a capacitor bypass. This seems a very strange amp.  Is there a sonic purpose to its design? Or was it born as a result of someone smart having a two 124bs and two 6J6s kicking around and deciding to see if they could make something work? Either way, it seems pretty unique and clever.
I don't recommend using "power" in the discussion of preamp design, it can get to be a problem.  I'm not so sure how the design originated, but it's a really easy circuit to lash together and listen to (other than the lack of phase indicators on the 124B, but you will clearly hear if the channels aren't in phase and you can flip one pair of output wires from one transformer around).
 
Thanks PB - Sorry, my message was sloppily worded - this is all new terminology for me. It's going to take me while to get the lingo down, and eons to become proficient with the math! I'm not going to tackle the math until after I get the amp built - for now, I'll just trust that the values are correct and focus on trying to understand how the different components within blocks of the schematic function together.

Edit: And just to be clear: I think you meant to write that the cathode becomes positive relative to the grid.
 
Oops, yeah, fixed that typo.

The problem with talking about power and preamp is that something like the BeePre will push a lot of voltage into loads from 1.2K to 100,000K.  This makes nailing down any kind of "power output" pretty difficult.
 
Recommended prototyping chassis material?

@PB - the last of the parts for the Nickel Wonder just arrived, and I need to decide on a cheap chassis. I don't want anything expensive or difficult to work with since I want to be able to move things around and add/remove components.  I am leaning towards perforated pressboard - the stuff with holes every inch or so that you sometimes see in stores for displaying/hanging wares.  I figure I can fold up some copper sheet and use that as chassis ground since it looks like the schematic calls for a ground plate to complete some circuits.  Would this potentially work?

If that's a no go, my fall back is to use aluminum baking sheets - but cutting holes in this will be a little more involved. So I'd like to avoid metal if possible.

Your thoughts?

Many thanks,

Derek
 
Thanks Doc! I have a bunch of plywood scrap kicking around that would work nicely.

Full metal terminal blocks or the kind with metal tabs and mounts that BH kits use?

Edit: I am assuming that "t strip" stands for terminal strip and not t-profile aluminum used for carpeting, tile, etc.
 
Assuming that Doc meant that I should screw terminal strips to the plywood, should I add a copper strip to act as chassis ground, or just solder all ground terminations to a common lug that is then wired to the ground of the IEC inlet?

I ask b/c I don't know whether surface area or mass of the chassis ground is important.

many thanks,

Derek
 
Ha! Thanks PB. That would work nicely for a permanent build, but I think it would make it difficult to experiment with different components and OT positioning relative to PT.

So I like Doc's idea of using plywood to prototype and experiment.  What I don't know is whether it's better to add a copper strip as ground plate or simply wire all connections to ground to a common grounded lug. 
 
John - that would be cool. Even cooler would be if you could help me understand the circuit. That way I'd not always be pestering PB - I prefer to spread my pestering around  ;D

From the so-called "conventional" view of positive electricity flow, I think I Have a really basic understanding of the circuits.  But when I analyze it in terms of negative flow, the circuit seems more complex - but at the same times makes more sense this way. 
 
Here you go, the case is a Stainless Steel tissue box IKEA use to sell. The power supply is in a separate except for the big oil cap you can see which is the last cap of the supply.

To better understand the circuit, redraw it a little. Remove the transformer and add 2 resistors, one end to each plate, the other to B+. Now you have a conventional differential amp stage, good circuit descriptions can be found in most any tube book...John


Attachments

  • IMG_1381.JPG
    IMG_1381.JPG
    105.2 KB · Views: 22
  • IMG_1380.JPG
    IMG_1380.JPG
    117.3 KB · Views: 22
  • IMG_1379.JPG
    IMG_1379.JPG
    81.9 KB · Views: 19
Thanks John. That tissue box makes for a pretty good looking amp! Do you use it?
 
@PB - How do I wire the pot? I am using a dual deck A100K that I took out of the S2 when I upgraded to the MourQuiet.

Please see attached diagram with pot (bottom view) and pot wiring schematic.  I have labeled the 3 lugs 1, 2, 3, (left to right, bottom view) and the pot connections on the schematic as A, B, C.

I am confused by the schematic b/c I would have thought that the signal input to a pot is wired to the wiper and would be represented by the wire with the arrow pointing to the middle of the resistor.  But that doesn't seem to be the case here.

Can you tell me which solder tabs goes with which schematic wire?

Many thanks,

Derek
 

Attachments

  • Nickel Wonder - Pot wiring.png
    Nickel Wonder - Pot wiring.png
    162.6 KB · Views: 5
If you wire the wiper to the incoming signal, then the pot will present a variable input impedance to your sources and a variable output impedance to the grid of the 6J6. 

I would suggest reading up on resistive voltage dividers, as a potentiometer is just a variable voltage divider. 
 
Thanks PB. I'll do that.

More practical question: Is the center solder lug on the pot connected to the wiper?  I can't find a datasheet that specifies which lug connects to what inside the pot.

Many thanks,

Derek
 
In order to figure out which terminal is the wiper, set the potentiometer to the center.  Now measure the DC resistance between various lugs.

The DC resistance between two of the lugs will be the value of the pot (100K), then you'll see a different lug that measures two lower resistances to that other pair of lugs, and this will be your wiper. 
 
Back
Top