No good after speedball upgrade

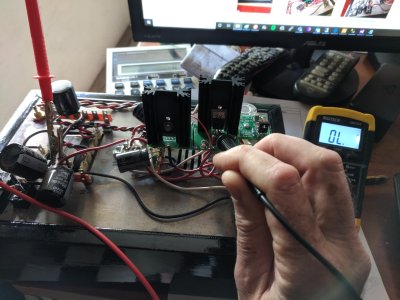
Yes, the charge will stay there for a long time, that's why you use the screwdriver to drain out the charge.

If you started with a perfectly working Crack, then put the Speedball in, then cooked that resistor, then the TIP50 transistors are unlikely to be properly mounted.  I know I've mentioned this before, but it's really important and if it's still an issue when you put the new resistor in, then you'll just get to do this all over again.
 
OK. Thanks Paul. So do you think I should remove the TIP50s and re-solder them?

Someone else mentioned a while back they thought it looked like centre pins on some other transistors were not soldered. Are there any other resistance or voltage checks I can do to make sure the speedball boards are assembled correctly?

As you say, and I keep thinking this, the Crack was working perfectly, so it must be something I did in the speedball installation.
 
The TIP50 issue isn't a soldering issue, it's an issue where the hardware used to mount the TIP50s to the heatsinks isn't properly installed. 
 
Just in case you've lost track of things.  The TIP50's need to be insulated from the heat sinks.  Earlier in the thread he provided one way to test this  by checking the resistance from the metal tab on the TIP50 to a ground point such as terminal 12.  It may also work by checking the resistance from the metal tab to the heat sink itself.
 
diynewbie said:
Just in case you've lost track of things.  The TIP50's need to be insulated from the heat sinks.  Earlier in the thread he provided one way to test this  by checking the resistance from the metal tab on the TIP50 to a ground point such as terminal 12.  It may also work by checking the resistance from the metal tab to the heat sink itself.

Thanks. That was a timely piece of advice.. I was unsure.

The resistance is 0L from all 6 "legs" of the TIP50 to Terminal 12. See attached.. clipped onto 12, touching TIP50 (just in case there is any confusion)
 

Attachments

  • IMG_20191112_095220.jpg
    IMG_20191112_095220.jpg
    512.2 KB · Views: 17
OK, when you get that 270 ohm resistor replaced, you can start by just firing the amp up with the 12AU7 and no 6080.  That will take the big board out of the circuit and let you test the small PC boards up front and the 12AU7.  The voltages on terminals 1-5 will look mostly correct, with terminals 2 and 4 being a bit on the high side.


Another funky thing that could have happened to your amp would be if the keyway broke off on the bottom of your octal tube, and then it got inserted improperly.  This can create all sorts of weird problems and a toasted power supply resistor is certainly an option.
 
Paul Birkeland said:
OK, when you get that 270 ohm resistor replaced

Thanks Paul. Does this look OK as a replacement? Says 270 ohm, 5 watt.

https://www.jaycar.com.au/270-ohm-5-watt-wire-wound-resistor/p/RR3284
 
The Xicon 270 ohm 5W resistor should be available from Mouser Australia.  It has leads that are long enough to reach across the terminal strips.

Failing that, just about any 270 ohm 10W resistor will also fit in that space and the leads will be long enough to reach the terminal strips. 

I'm not sure that the one you linked to would reach across.
 
Paul Birkeland said:
Failing that, just about any 270 ohm 10W resistor will also fit in that space and the leads will be long enough to reach the terminal strips. 

OK. I'll look for the Mouser one. I thought the one I was replacing was 5W?
 
Back
Top