Need Help with First Tube Build - WE91 300B Parafeed Derivative

EricS

Member
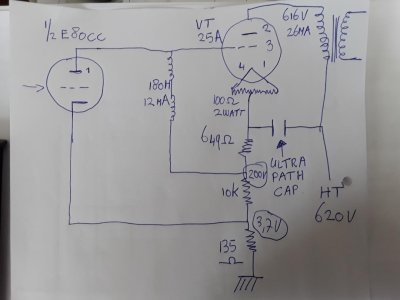
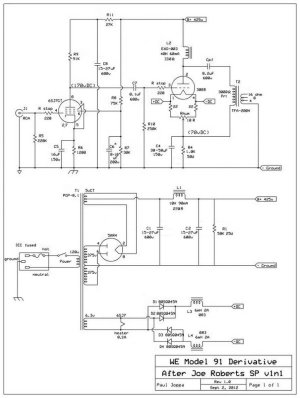
For the past two years, I've been gathering parts for a new tube amp - the Magnequest iron took the longest time to track down and several of you here have contributed - thank you.  I have built lots of solid state stuff, but this will be my first tube amp.  The design is Paul Joppa's parafeed update to Joe Roberts' Western Electric Model 91 300B that was published in Sound Practices in the Summer 1992 issue.  Paul has graciously granted his permission for me to post his design and my thread here.  Thank you, Paul!

This build will likely take me several months to complete from here.  Since this is my first tube build, I'm likely to need a fair amount of guidance in the form of "hey, dummy - don't do that!"  I have read Morgan Jones' "Building Valve Amplifiers" and have tried to incorporate his long list of physical layout guidelines, though I'm sure I have missed several fundamentals. 

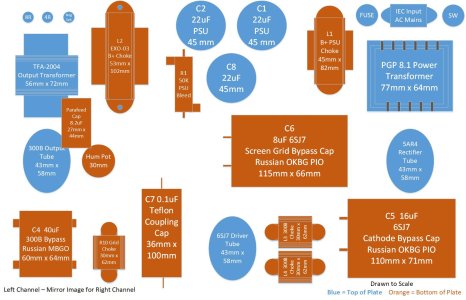
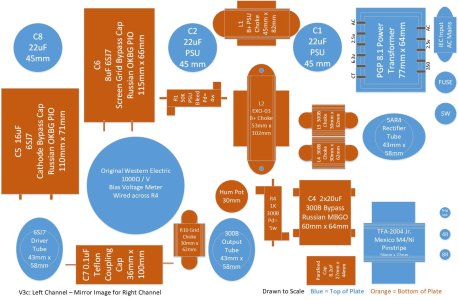
Attached are Paul's schematic (I have added all of the parts values) and my first attempt at a 2-dimensional layout the physical components (quick and dirty Visio drawing - for easy rearranging over time).  The overall top plate as of now is 11" x 17" and each of the parts is drawn relatively close to actual scale.  The final layout will likely be a little smaller in footprint.  The blue components will be mounted on the top of the plate, the orange components will be hidden on the bottom of the plate.  I have aimed for both visual appeal (physical symmetry of top-of-plate parts) and what appears (to me, at least) to be a reasonable first pass at an electrical layout.     

Here is where I need your help:  What have I done wrong?  Which parts should not be next to one another?  How can I improve the parts layout to improve running wires or preventing unwanted interactions?

My ongoing thanks and appreciation in advance!
 

Attachments

  • Schematic Joppa Derivative Roberts WE91 300B.jpg
    Schematic Joppa Derivative Roberts WE91 300B.jpg
    121 KB · Views: 166
  • 300B Chassis Layout v1.jpg
    300B Chassis Layout v1.jpg
    146.9 KB · Views: 102
The book you've read is the first thing i'd recommend to reread  :P
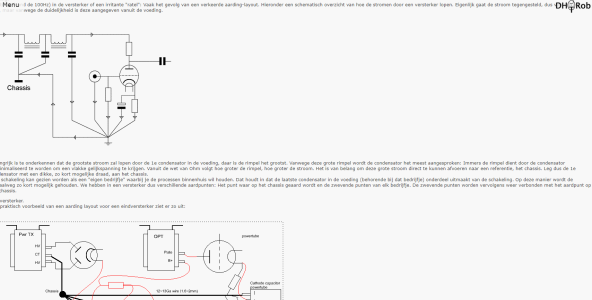
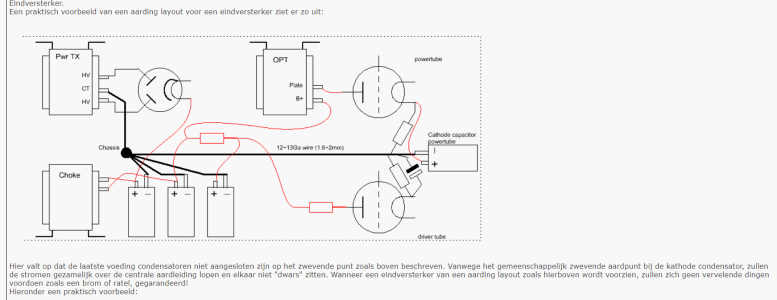
. It covers all basics on tube amp layout. With every layout i try, i'd reread it several times and combine this with the BH manuals i own. To see what practices i could improve on, even after the breadboard. Searching the internet for completed versions of your amp also helps a lot ime.
I'd advice on revisiting the pages about transformer and choke orientation relative to eachother (there's always room for improvement).
The most important part is your grounding scheme, make this your first step in the build. The book is a good reference for this, but here's another good link: https://www.aikenamps.com/index.php/grounding
Good luck with your build.
 
I think you have the PGP 8.1 and the TFA-2004 aligned.  To double check this, tile print your layout to scale, set the parts on the piece of paper, then take another photo.

I would also double check with PJ to be sure that L3 and L4 are separate parts.  I suspect they are intended to be different windings on the same choke.
 
L3 and L4 are separate, since for this I wanted to specify readily available parts (except for the Magnequest items - I did this design for the MQ forum).
 
Tom - thanks for the link to the Aiken Amps article on grounding.  I'm reading it now.  I also have been looking at a few of the Bottlehead builds that people have documented  in various places as well as some kit manuals of various origin.  I see that many of the Bottlehead kits feature star grounding.  The Aiken concept of multiple stars (PSU, small signal) looks interesting.  I'll have to draw out some wires on my diagram and see how to optimize major components to keep things clean.

Paul B - I used this resistor RH05050K00FE02 : https://www.mouser.com/ProductDetail/Vishay-Dale/RH05050K00FE02?qs=sGAEpiMZZMtbXrIkmrvidDNaDpN5VXc5qswg6VdgV68%3D  Not sure if it was the "normal" or "non-inductive" variety that I purchased, I'll have to check my invoice.  Good eye, my power and output transformers are not quite aligned - this is an easy fix.

Paul J - Thanks for the confirmation.  I take it from our previous email that asymmetry in the chokes for the DC filament supply is not really a problem if I'm trying to hit a specific voltage target.  Is stacking these chokes OK for conserving physical space under the chassis, or should they be mounted 90 degrees to one another to avoid interactions?  Or will arranging them 180 to one another provide some benefit if they are stacked or physically parallel to one another?
 
I'm glad you went up a size.  Those chassis mount resistors get really hot without a huge heatsink as you approach a small percentage of their rated power, but with a 50W one I think you'll be OK.

If the coils on the TFA-2004 and PGP8.1 are aligned in your photo, I would recommend rotating the PGP8.1 rather than the TFA-2004.
 
PB  - Yeah, I thought moving from 25w to 50w for the bleeder resistor would be a good move.  The data sheet still indicates a pretty steep derating curve, even when the resistor is mounted to a 12" x 12" metal plate.  I also adjusted the PGP transformer orientation and added some detail in the diagram to indicate the direction of the transformer laminations for clarity.

I'm working on seeing what the grounding/wiring layout looks like with this parts arrangement. 
 

Attachments

  • 300B Chassis Layout v2.jpg
    300B Chassis Layout v2.jpg
    161.7 KB · Views: 45
Where did you find 40uf MBGO's? I'm planning on the same as cathode bypass for the SII 2a3, but only found 30uf as largest size (so settled on using 2/channel if it fits). A single 40uf would sure help.
 
Ah - you've caught me.  My 40uF MBGO is actually two individual 20uF 160v caps.  Compared to the paper and tin foil caps, these are pretty small.  I like them because they have a nice mounting tab welded across the bottom.    I measured all of my Russian caps for leakage, the MGBO had about 1uA of leakage on my meter.  I also charged them up to 150vDC and let them sit for 24 hours.  After this time, two of them had only 8% of their initial charge left, one had 26% left, and the best of the lot had 40% of the initial charge after a day.  I'll see how they perform in the amp.  If they don't work out, the MBGO will get replaced with an ASC 45uF big can cap.   

The OKBG are paper and tin foil and performed much better.  I could measure no leakage on my meter and these all had about 70% of their initial charge (350vDC) remaining after 24 hours.  I figured none of this was very critical as they are all bypassed by resistors that will drain them much faster than their own internal discharge rates will. 

The Aiken Amps paper on grounding is an excellent resource.  I've read it several times now, making notes along the way, and have a trivia question for the crowd:  Is Star grounding or Buss grounding preferred?    I'm thinking this design lends itself nicely to using three star grounds, one on each of the main 20uF caps to make increasingly "quieter" ground points.
 
Hello,
This drawing from A Dutch side is the way i usually do it.
And i always follow the advice to keep wires between transformer, rectifier, input choke and first capacitor at a minimum length.
Greetings, Eduard
P.s i hope attaching worked
 

Attachments

  • 2019-07-06 (2).png
    2019-07-06 (2).png
    74.8 KB · Views: 52
  • 2019-07-06 (3).png
    2019-07-06 (3).png
    89.9 KB · Views: 37
Hello Eric,
Their explanation. The closer the cap is to the transformer/ rectifier combination the bigger the current will be so that connection should be short. The last capacitor in the power supply they regard as a part of the circuit itself. There should not be much of a ripple left to take care off.
Greetings, Eduard
P,s i think i will try to get the majority of the caps/ the number of mF have their return to the spot located close to the transformer and then have a cap like 10 mF right next to the output transformer??
 
Bardamu said:
The last capacitor in the power supply they regard as a part of the circuit itself. T
This is absolutely true in a series feed amp, but far less important in a parallel feed amp, as the parallel feed cap takes over the lion's share of this duty.
 
Hello Paul,
Is this comparable to my future amp as seen in the attachment where a so called ultrapath cap is used.
They say it takes the power supply caps  out of the circuit. But what is also does is injecting noise from the power supply into the circuit. So they say the power supply must be dead quiet.
So one must take care of this by using good parts in the supply. But the quality of the ultrapath must be top notch too i guess.
Greetings, eduard
 

Attachments

  • thumbnail.jpg
    thumbnail.jpg
    56.8 KB · Views: 42
I am definitely not sold on the ultrapath topology.  You end up moving where the cathode bypass cap is and requiring it to have a significantly higher voltage rating.  Ultimately to do so with a film cap ends up requiring the same part that you would use for a power supply filter stage anyway.  The observations about the issues of power supply noise are quite relevant.
 
I've been playing around with wiring and parts layout and have two diagrams now.

The first is the original layout that I posted a few days ago - we'll call this one V1.  The primary problem that I see with this layout is that the wiring turns into a rat's nest pretty quickly.  I haven't been able to draw a wiring diagram for this layout that I'd call clean or neat. 

The second one -V2- will keep the wiring neater with fewer crossovers, shorter overall wire lengths, and what appears to be a "cleaner" grounding configuration, but requires running AC for the driver heater all of the way to the opposite corner of the chassis, past the output transformer & tube.  I'm thinking this might be a problem.  I'm also not sure where the best place for the speaker outputs would be on this design.

Which one of these do others prefer?  Or should I keep playing around and come up with a third layout?


Attachments

  • 300B Chassis Layout v1.jpg
    300B Chassis Layout v1.jpg
    162.4 KB · Views: 13
  • 300B Chassis Layout v2.jpg
    300B Chassis Layout v2.jpg
    161.5 KB · Views: 18
Thanks for the confirmation, Paul.  I suspected this would be the case but don't have any experience with the tradeoffs.  I suspect it is better to keep the heater AC as far away from the rest of the circuit as possible, but I can't seem to come up with a configuration that lets me do this cleanly.

I've been working on a v3 parts layout that has a much cleaner grounding and overall wire layout than what I've posted so far.  In the mean time, I have two questions:

1) can I stack L3 and L4 (300B filament chokes) on top of one another to save a little space?  Or is this an example "don't do that" ?
2) is the position of the EXO-03 B+ choke OK in physical relation to the PGP8.1? 
 

Attachments

  • 300B Chassis Layout v3c.jpg
    300B Chassis Layout v3c.jpg
    179 KB · Views: 15
You can certainly stack the filament chokes.

In the image you just posted, the PGP8.1 and TFA-2004 appear to be aligned,  I would rotate the TFA-2004.

The EXO-03 shouldn't cause you any problem, especially being all the way across the chassis from the power transformer and oriented as it is.
 
Back
Top