Follow-up to the following thread:
Wanted a quick sanity check before doing some drilling.
Wiring question/confirmation:
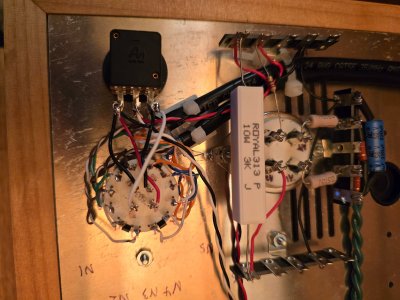
I'm assuming the best way to keep balance control with the BeeQuiet would be to wire it directly after the input selector (same as stock without upgrades). So I would just skip page 21 of the BeeQuiet manual (not wire the 100k resistor between N5L/N4L and N1L/N2L)? Any resistor changes needed other than skipping the balance control deconstruction steps?
Drilling sanity check:
Assuming that the balance pot should be directly after the input selector my thought is to keep them next to each other, and to bump the coarse/fine pots to the left. Red lines indicate where I plan to cut the acrylic to split the layout.
Layout order: Coarse Fine Balance Inupt

Any possible issues with this move other than the obvious extra holes etc.?
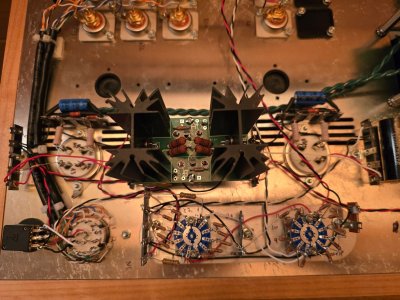
It does look like I'll get the coarse attenuator kinda close to those 5W wirewound resistors. Other than possible clearance issues is proximity a problem?
Thanks for looking!
I currently have a topping dx9 as a DAC for digital signals and an Eros2 feeding into the mainline and I don't anticipate additional inputs. Very happy with this setup, but what can I say, I have the bug for another project. 8)
I think my main question is if I would lose anything adding a stock BeePre2 in the mix before the mainline in terms of (noticeable) noise or resolution? What about a fully upgraded one?
I know I would gain some...well gain of course, the balance control which I do really want, the sweet sweet look of some 300b's, and of course a fun new project. Anything to...
Wanted a quick sanity check before doing some drilling.
Wiring question/confirmation:
I'm assuming the best way to keep balance control with the BeeQuiet would be to wire it directly after the input selector (same as stock without upgrades). So I would just skip page 21 of the BeeQuiet manual (not wire the 100k resistor between N5L/N4L and N1L/N2L)? Any resistor changes needed other than skipping the balance control deconstruction steps?
Drilling sanity check:
Assuming that the balance pot should be directly after the input selector my thought is to keep them next to each other, and to bump the coarse/fine pots to the left. Red lines indicate where I plan to cut the acrylic to split the layout.
Layout order: Coarse Fine Balance Inupt
Any possible issues with this move other than the obvious extra holes etc.?
It does look like I'll get the coarse attenuator kinda close to those 5W wirewound resistors. Other than possible clearance issues is proximity a problem?
Thanks for looking!