Curly Maple & Cocobolo Quickie

jodgey4

New member
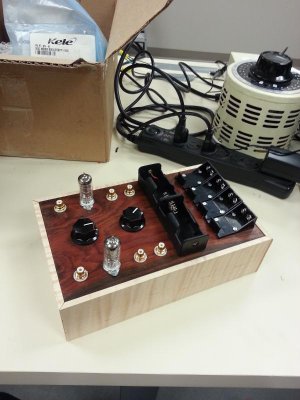
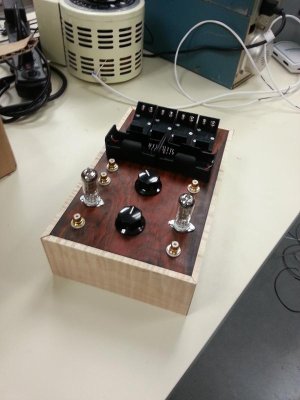
Thought I'd show off my beautiful Quickie that a friend and I spent a stupid number of hours on (for the box at least). Curly maple sides, and a cocobolo top plate cut mostly with a CNC (some holes had to be drilled by hand). I got to learn how to use basic features in Solidworks and getting the design all the way to where the CNC could work its magic. Check out a time lapse video here: http://vimeo.com/83532577
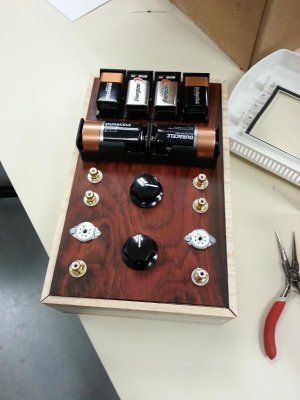
I got lazy and only used 120 grit sandpaper, but three coats of low-gloss tung oil made it all okay. The Quickie itself went together without a hitch, and the PJCCS was installed from the beginning. One of the tubes is giving me issues, it would seem, but other than that the sound is great! I set it up in front of a NAD 356BEE amp and PSB Image B6's, and for the first time, I actually felt drawn to sit down and listen. A much more beautiful sound signature! The only thing left is to glue up the box, and put on the badge.
Overall, a fantastic experience!
 

Attachments

  • Quickie 1.jpg
    Quickie 1.jpg
    99.8 KB · Views: 641
  • Quickie 2.jpg
    Quickie 2.jpg
    99.6 KB · Views: 363
  • Quickie 3.jpg
    Quickie 3.jpg
    78.1 KB · Views: 352
  • Quickie 4.jpg
    Quickie 4.jpg
    70.2 KB · Views: 365
Nice job and timber choice.

How did you get on with learning solidworks? I remember it was quiet popular with the guys in a design office I once shared some space with.  I was doing QA work but have no hands on experience with it myself.  It would be a useful to learn the basics of CAD.
 
It always amazes me when I see a duplicated top plate with all the holes parallel and perpendicular.  It is something I could never do.

That is a beautiful build.


With such a pretty wood on top why not flip the battery holders to the underside?
 
Grainger49 said:

With such a pretty wood on top why not flip the battery holders to the underside?

Grainger I have often wondered the same when looking at many of the quickie non standard builds if making a new top you could do away with all the associated battery fixing through holes by mounting/gluing to the underside.

When my quickie kit arrives (courtesy of Cyber Monday ;D) I think I might do this, I have premade made the case already I am not sure if I will make a new top or swap over the fastenings for counter sunk heads and counter sink the battery bolt holes on the Perspex top then veneer over the top.

Another option that appeals would be to shorten up the Quickie enclosure making it a square but and slightly taller and locating the batteries underneath the tubes and pot.

With all the custom builds like this Curly Maple & Cocobolo Quickie and other builds on the forum its a great place to spend time gain knowledge and be inspired.
 
Grainger49 said:
It always amazes me when I see a duplicated top plate with all the holes parallel and perpendicular.  It is something I could never do.

You can buy double sided tape, tape the existing plastic chassis plate to your intended chassis, then drill through the existing holes.

-PB
 
Caucasian Blackplate said:
You can buy double sided tape, tape the existing plastic chassis plate to your intended chassis, then drill through the existing holes.

-PB

I'm not even sure that my hands would be steady enough doing that.  But I might try it sometime soon.
 
What about a battery "drawer".  It would take a bit to build but with the right connector in the back it might be completely hidden and easy to change.  Been thinking through a new quickie  build...just an idea.
 
Thanks for all the kind words! I kept the batteries on top for a couple of reasons. First of all, I don't mind the look, I think it looks very DIY, and the chrome nuts I think would've looked even goofier. Secondly, I was kind of in a hurry to finish this project before my friend headed out of town, so instead of properly buffing out some scratches from the planar and from the holes being drilled, it was too easy to just cover all that up with giant battery covers. I think if I were to do it again, I'd come up with something better. And for those of you with great eyes, you might notice that the 9V's are backwards, because I drilled the triangle pattern from the backside, so I had to turn around the holders to fit. I also had to redo the switch and potentiometer alignment pins. So, yeah. It was pretty sloppy work but everybody I've shown so far has no clue. My goal was to get a clean box and cool looking plate, and I achieved it very well IMHO.
Originally, I was going to get some carbon fibre DragonPlate, as inspired by pictures of JaimeMcC's gorgeous build, or go and pull out some of my dad's stored carbon fibre sheets and make my own, but then I realized how much time or money that would take, and so I took a different route.
As far as the plate design goes, the only big adjustment I made was centering up the tube sockets with the RCA jacks. Everything else I put to within 5% of the original, just straightened things up a tad in Solidworks, just a few guiding lines and 2d circles was all it took. My friend taught me everything I needed to know in about 5-10 minutes. It can be intimidating at first, but I was impressed at how easy the design went together. I'll save 3d projects for later :).
 
Let me join the parade of those who compliment your work .

...and I like the look of the batteries on top too. "...and what did you do for your science fair project???" 
 
jodgey4 said:
I also had to redo the switch and potentiometer alignment pins.

Yeah, the alignment pin on the rotary switch is particularly tough.  It took me a few tries to make an acceptable Fix template, as at least one of the four switches wouldn't fit several times.
 
Updated pictures, that's all  ;D.
 

Attachments

  • Quickie A.jpg
    Quickie A.jpg
    85.1 KB · Views: 324
  • Quickie B.jpg
    Quickie B.jpg
    58.3 KB · Views: 329
  • Quickie C.jpg
    Quickie C.jpg
    47.8 KB · Views: 277
  • Quickie D.jpg
    Quickie D.jpg
    48.1 KB · Views: 323
Another impressive build. Watching the CNC process was a kick, jodgey4

    ....... All212,  Battery drawer....hmmm I like it
 
Back
Top