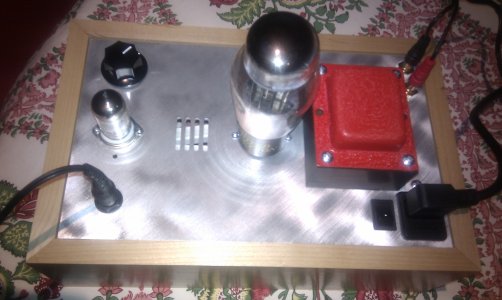
So , the Journey to becoming a Crack addict began a few weeks ago with the selection of a finish for the Alder Base that would protect the base, but preserve the natural beauty of the timber. I chose a Canauba based wax which lifted the grain and gave a high gloss finish when buffed.The transformer bell needed to stand out so a "fire engine red" wrinkle finish heat cured paint that also looks great on rocker covers was next. Then down to the hardware assembly.
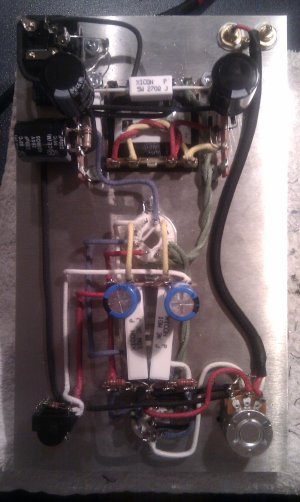
I decided to make this build a reference to the construction qualities of the days when tubes ruled supreme. Attention to detail, alignment of screws, chassis wiring to the RMA standard of the 40s. Cotton covered solid core wire for general hookup and a mesh screened super flexible input cable with woven cotton cover from RCAs to attenuator. The Tubes used from "The Stash" (after much rolling) were a Haltron 12AU7A small plate for the first stage. This has thick internal mica , is very low noise and no microphonics. Output tube after trying a NOS 6080 and a United 6AS7 , I settled on a black plate RCA 6AS7 from my Ampex 300 spares box. This turned out to have much better bass than the others and is exceptionally quiet.
The rest of the amp is all stock parts from the kit.
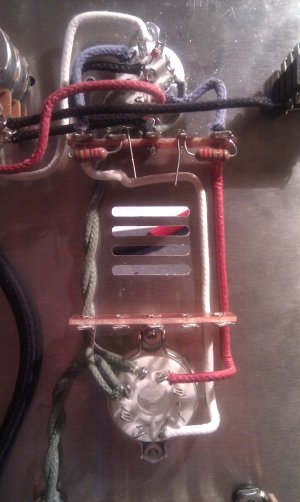
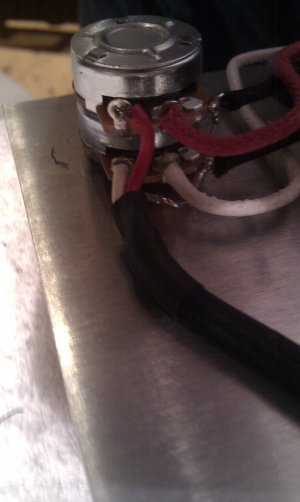
I took particular interest and time in the dressing of the wiring, taking the time to exactly measure , then shape each wire to be both asthetically pleasing and preserve correct spacing to minimize cross talk and hum .
It did take an extrordinarily long time to put together, close to 7 Hours to wire and solder.
Soldering was done very carefully, again to make the build visually pleasing as well as performing well.
The result.... An extremely quiet amp with extrordinary detail and soundstage. It is the quietest amp I own, tube or SS.
After checking Voltages , I collected the HD-250 II Sennheisers and "Can't Buy A Thrill" and the trusty Pioneer PD-S901 CD player. After 30 seconds of "Dirty Work" I was hooked. Hours were wasted finding tracks to re-listen to.
This Amp has ruined me.
I won't be able to listen to some of the others in my collection again. It won't be worth the disappointment.
Now I must start on the Stereomour..........
I decided to make this build a reference to the construction qualities of the days when tubes ruled supreme. Attention to detail, alignment of screws, chassis wiring to the RMA standard of the 40s. Cotton covered solid core wire for general hookup and a mesh screened super flexible input cable with woven cotton cover from RCAs to attenuator. The Tubes used from "The Stash" (after much rolling) were a Haltron 12AU7A small plate for the first stage. This has thick internal mica , is very low noise and no microphonics. Output tube after trying a NOS 6080 and a United 6AS7 , I settled on a black plate RCA 6AS7 from my Ampex 300 spares box. This turned out to have much better bass than the others and is exceptionally quiet.
The rest of the amp is all stock parts from the kit.
I took particular interest and time in the dressing of the wiring, taking the time to exactly measure , then shape each wire to be both asthetically pleasing and preserve correct spacing to minimize cross talk and hum .
It did take an extrordinarily long time to put together, close to 7 Hours to wire and solder.
Soldering was done very carefully, again to make the build visually pleasing as well as performing well.
The result.... An extremely quiet amp with extrordinary detail and soundstage. It is the quietest amp I own, tube or SS.
After checking Voltages , I collected the HD-250 II Sennheisers and "Can't Buy A Thrill" and the trusty Pioneer PD-S901 CD player. After 30 seconds of "Dirty Work" I was hooked. Hours were wasted finding tracks to re-listen to.
This Amp has ruined me.
I won't be able to listen to some of the others in my collection again. It won't be worth the disappointment.
Now I must start on the Stereomour..........