Smash build with a few wonky resistance measurements (resolved)

2wo said:
In the last pic you posted of the back of the Reg board, is the solder connection at the lower left,  closest to the screw perhaps touching the top plate?...John

Good catch John.
 

Attachments

  • Short.jpg
    Short.jpg
    49.1 KB · Views: 21
Hey guys,

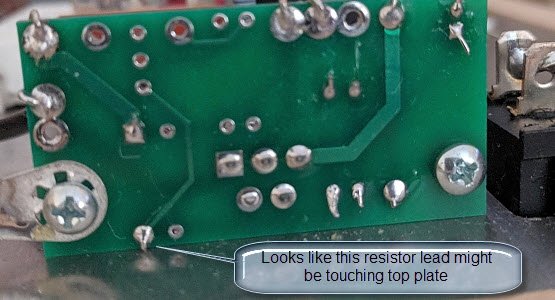
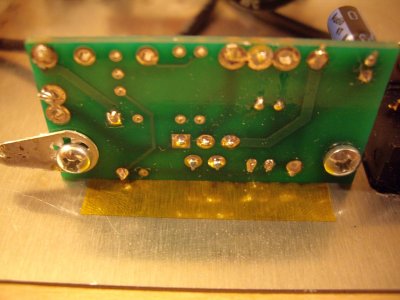
Alright. It did not seem to me that the solder touched the chassis plate, but I trimmed a little more, and re-soldered here and there. Just to be on the safe side, I have also put a bit of Kapton tape underneath the PCB where it touches the chassis.
Redid my resistance measurements, and they are all spot on now. You guys were right! Thanks to eagle eyes 2wo and Natural sound, I can go ahead and do my voltage checks tomorrow! And a big Thank you! to PB for all the troubleshooting and leading me to the PCB board with his patience and awesome response times! And thanks also to Oguinn for the suggestion with the Dremel tool. Cheers, FS
 

Attachments

  • s1.jpg
    s1.jpg
    540.9 KB · Views: 10
  • s2.jpg
    s2.jpg
    497.8 KB · Views: 13
After the resistance measurements checked out, I moved on to the voltage measurements. Everything came out to be within 5% of the listed values. I hooked it up to the Seductor. It sounds very different from the SS pre-amp. I can't explain the signature very well. It sounds both blurry yet detailed. It is easy to get the Orcas to show distortion or clipping, something I did not get from the Seductor when driven with the Pre V630. When I hooked it up to the Crack, I heard the same kind of distortion when turning up the volume on the Smash. I have the smash-up ready for installation. It seems that people observe even more tube microphonics with the upgrade, so I am wondering if it will be worth it.
 
Thanks! That is what I needed to hear :) How much more in improvement would be there to be gained from the additional SmashQuiet upgrade?
 
The SmashQuiet will have perfect channel balance and some qualitative improvements that are also substantial, but not as substantial as what the Smash-up provides.
 
I have installed the Smash-Up. All voltage measurements were spot on. I have put the pre-amp back in front of the Seductor. The sound is now completely different from what it sounded before.  :o It sounds awesome.  :) I am not good at describing sound signatures. I just feel that it sounds right to me. Also, the clipping with the Orcas is gone. Now I understand why BH later folded this upgrade into the base kit. I would not want to have to go back to the stock version. The only thing I am missing is the awesome purple glow from the poor tube that had to make way for the 6SN7. I am seriously considering the SmashQuiet now. However, I may not be able to hear a difference if it is too subtle  :) While the 6SN7 tube seems now as microphonic as the 4P1L tubes (the OD3 was quite), it does not really bother me. Thank you, Bottlehead! This was a very satisfying build. FS
 
I have now completed the SmashQuiet installation. To be on the safe side, I started with the resistance checks as outlined in the basic Smash manual. Everything checks out as it is supposed to, except fo B2, which shows a value of OL instead of 0. I have re-soldered all taps on the B socket, and the red wire from 4 to B2. Does the SmashUp change any of the resistance values on the B socket? I was assuming that none of the resistance checks changed from basic Smash to SmashUp, correct? Thanks!
FS
 
FS said:
Does the SmashUp change any of the resistance values on the B socket?
Yes, all of them, especially the 4 pins on the octal socket that have no connections in the stock Smash but get connected for use with the 6SN7 in the Smash-up.
 
Back
Top