Big Bamboo
Member
First, let me reinforce the idea that most anyone can build this kit assuming one takes some time to learn basic soldering skills. The instructions are excellent, leaving no ambiguity at any step. Kudos to Doc and the gang for doing such a good job with that.
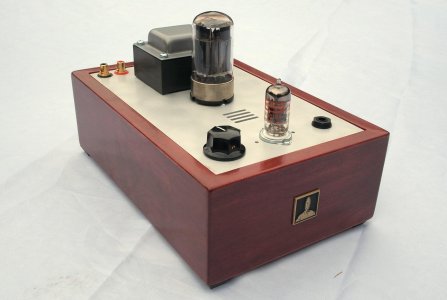
The base was stained with Minwax Sedona Red and finished with satin polyurethane. The chassis plate and transformer bell were sprayed with Rustoleum enamel satin clear coat.
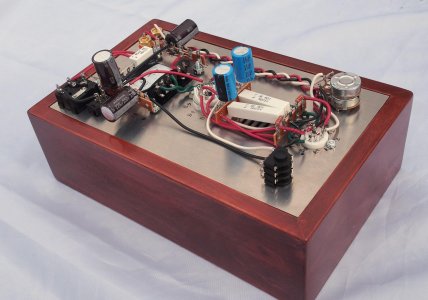
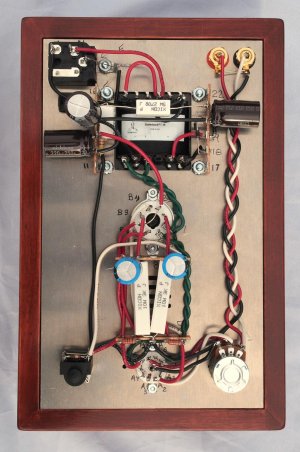
The only snag I hit in the entire build was having difficulty threading the holes in the terminal strip using the self tapping screw. After a few minutes filing the inside of the holes with a small round file, it was easy to do per instructions.
All the resistance and voltage checks were spot on right off the bat.
I purchased a nice wire stripper, cutter and needle nose pliers which were essential. I owned a “Mickey Mouse†DIMM from radio Shack which I purchased years ago for less than $20. It worked fine for this build.
I found magnification to be very helpful for some steps. I own a pair of high quality surgical loupes which I used. I am sure a magnifying glass on a holder would have worked as well.
I have paired it with a Sennheiser HD 600 which sounds great. There is essentially no background noise, even at full volume. I am now playing around with various input sources in order to optimize the set up before I install the speedball which I purchased at the same time.
I had so much fun doing this that I recently enrolled at our local community college for a course with lab in AC/DC circuits.
All in all, a very enjoyable experience!
John
The base was stained with Minwax Sedona Red and finished with satin polyurethane. The chassis plate and transformer bell were sprayed with Rustoleum enamel satin clear coat.
The only snag I hit in the entire build was having difficulty threading the holes in the terminal strip using the self tapping screw. After a few minutes filing the inside of the holes with a small round file, it was easy to do per instructions.
All the resistance and voltage checks were spot on right off the bat.
I purchased a nice wire stripper, cutter and needle nose pliers which were essential. I owned a “Mickey Mouse†DIMM from radio Shack which I purchased years ago for less than $20. It worked fine for this build.
I found magnification to be very helpful for some steps. I own a pair of high quality surgical loupes which I used. I am sure a magnifying glass on a holder would have worked as well.
I have paired it with a Sennheiser HD 600 which sounds great. There is essentially no background noise, even at full volume. I am now playing around with various input sources in order to optimize the set up before I install the speedball which I purchased at the same time.
I had so much fun doing this that I recently enrolled at our local community college for a course with lab in AC/DC circuits.
All in all, a very enjoyable experience!
John