rickdagless
New member
Hey there!
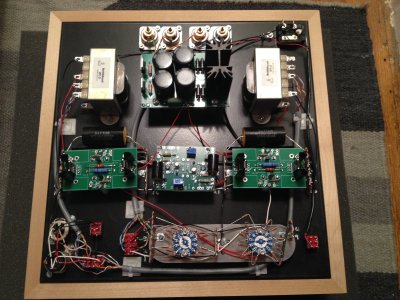
I finished up the Mainline build (along with the interconnect and power cable kit) just a couple days ago.
I'm a first time solderer/builder and was initially overwhelmed at the prospect of building this kit, but everyone on the forum was so positive and confident that I felt that, as long as I stuck with it, I would eventually have a successful build. I took my time and went extremely slowly. I can't even count how many times I would check my work.
Still, by the time I had finished, I doubted my solder joints would really work. And to my surprise, the kit passed all the tests. That felt great. But still, I needed to see if it would really work.
I hooked everything up, turned the attenuator to a low-ish setting, put on my headphones and flipped the switch. The startup ringing sound came on, and went away. Then the fuzz came, and went away in each channel. And I was then completely enveloped by silent darkness. With baited breath I played the first song -- Bill Evans' Israel from the album Explorations. Stunning. It hit hard, crisp, but was so smooth. And everything worked! Wow! Been spending a lot of time with the Mainline since.
I didn't know I could do it and I truly doubted myself -- it's no small thing to be able to prove your own doubts wrong. So thank you to the Bottlehead crew for this kit, and also to everyone on the forums. What an experience!
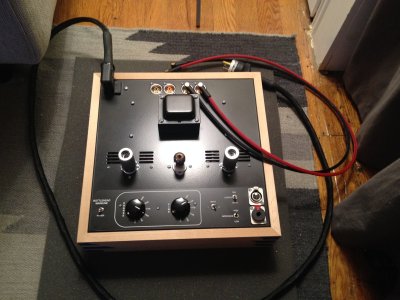
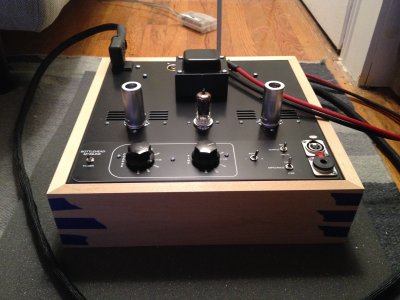
I've posted some pictures below and, if you don't mind, would love to hear your feedback regarding the wooden base. It's the one thing I didn't finish yet. I'm still not sure where I'd like to go with it, but I really liked what tdubl07 did here: http://bottlehead.com/smf/index.php?topic=6070.0. I think a distressed/vintage look might look really cool. The top is powder-coated black, by the way.
Thanks for reading!
I finished up the Mainline build (along with the interconnect and power cable kit) just a couple days ago.
I'm a first time solderer/builder and was initially overwhelmed at the prospect of building this kit, but everyone on the forum was so positive and confident that I felt that, as long as I stuck with it, I would eventually have a successful build. I took my time and went extremely slowly. I can't even count how many times I would check my work.
Still, by the time I had finished, I doubted my solder joints would really work. And to my surprise, the kit passed all the tests. That felt great. But still, I needed to see if it would really work.
I hooked everything up, turned the attenuator to a low-ish setting, put on my headphones and flipped the switch. The startup ringing sound came on, and went away. Then the fuzz came, and went away in each channel. And I was then completely enveloped by silent darkness. With baited breath I played the first song -- Bill Evans' Israel from the album Explorations. Stunning. It hit hard, crisp, but was so smooth. And everything worked! Wow! Been spending a lot of time with the Mainline since.
I didn't know I could do it and I truly doubted myself -- it's no small thing to be able to prove your own doubts wrong. So thank you to the Bottlehead crew for this kit, and also to everyone on the forums. What an experience!
I've posted some pictures below and, if you don't mind, would love to hear your feedback regarding the wooden base. It's the one thing I didn't finish yet. I'm still not sure where I'd like to go with it, but I really liked what tdubl07 did here: http://bottlehead.com/smf/index.php?topic=6070.0. I think a distressed/vintage look might look really cool. The top is powder-coated black, by the way.
Thanks for reading!
")