Mainline Build Questions

adydula

New member
Hello,

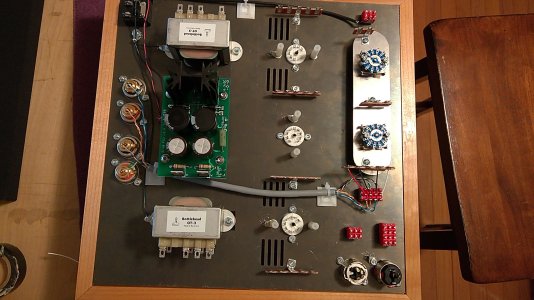
Got my kit yesterday and am starting the install of the mechanical parts.

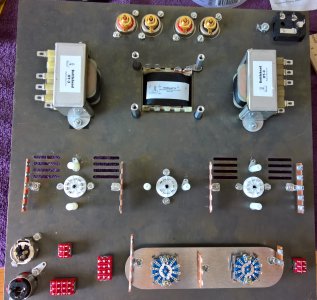
I am missing one of the #6 smaller fiber shoulder washers used or the OT3 transformers.

It looks like these fiber shoulder washers center the mounting screws so they dont touch the sides of the main panel and
thusly isolate the transformers chasis from the mounting plate?

On the one OT3 I have mounted the resistance between the transformer mounting case is infinite.

So is this very important that these xfmrs are indeed mechanically and electrically isolated from the main panel??

Thanks
Alex
 
OK second "dumb" question....:>)

When mounting the volume switches on the small aluminum plate.

Your instructed to remove the 4 components, then set up the stop washers for the 5 clicks and 6 positions.
No problem here.

Then when you mount the switches, there is no mention of using the lock washer? Is this intended or is it not used?

Thanks
Alex
 
If you're missing a #6 shoulder washer, then yes, I would ask for a replacement to be mailed.  The transformers are all isolated from the chassis but provided dedicated connections to safety ground. 

On the attenuator switches, the lock washer should go right under the nut, but it's not the end of the world if you don't use it.
 
Again thanks...I used them....please dont take my anal questions the wrong way..I was a software, tech manual QC guy!! lol...

Soldering the boards now and painted the Bell housing ...looks great.
Alex
 
Ok heres another thing I noticed:

In the instructions is calls for 3W and 2W 100k resistors:

100KΩ 3W resistor (brown, black, yellow, gold) into the R2 position on the A side

100KΩ 2W resistor (brown, black, yellow, gold) into the R2 position on the B side

In the schematic I see 100K 5 watts 5% in the dual shunt regulators??

Alex
 
I believe when the schematic was drawn, we had a 100K/5W part in the inventory.  The resistor dissipates about 0.75W, so a 3W part was substituted in its place to make for a cleaner build.  The 5% note in the schematic is PJ's way of saying that the tolerance isn't super critical.
 
Is the reason the transformers are mounted with insulatiing washers for safety only? or is there any reason electrically? is ground loops or grounding issues circuit wise?

Understand the safety ground...

Alex
 
Isolating the transformers from the chassis reduces magnetically induced currents in the chassis plate itself, which helps provide a lower noise floor.
 
Thanks for that information, quite interesting.

Well, I got all four boards populated and soldered up, cleaned with alcohol and a acid tin brush to get the flux residue off the bottom side of the boards. Just waiting on the 49.9 ohn resistors to complete.

Everything is mounted on the main panel except one of the OT3 transformers (need the fiber shoulder washers) and the Primary power transformer....waiting for my bell housing paint job to dry....:>)

Will stop and recheck all parts install for correctness and then start on the wiring stuff.

When you open the box at first I thought gee there's not really much too this amp! Then when you start working on it you realize this is more than a one day project !! :>)

Really enjoying the build so far...

Alex
 
Ok. I was mounting the power transformer and noticed I am missing (2) of the star washers...so the next dumb question is:

Can I use plain old lock washers here??

Alex
 
Ok. I went over to the Lowes hardware store and bought some star washers, rather than wait for the ones in the mail...np.

I also sovled the issue of the missing fiber shoulder washer I had some fiber washers in my tool "bag" and made one up...

I noticed that when I tightned down the screw and leasure the case of the OT3 to the main panel it was shorted out...

The OT3 transformer (only one) had its outside metal casing crimped on the bottom of the laminations, well on one it wasnt crimped nice a flat and
even with the fiber washers it was scraping the main panel...I carefully pressed it down and voila its not shorting to the panel.

So I have all the mech stuff done and but for the 49.8 ohm resistors the boards are done as well...

So on to the wiring and hope the resistors arrive soon,,,

Alex

Tww coats of Tung Oil so far...
 

Attachments

  • 1111.jpg
    1111.jpg
    1.8 MB · Views: 36
  • 2222.jpg
    2222.jpg
    1,014.4 KB · Views: 33
  • 3333.jpg
    3333.jpg
    1.7 MB · Views: 33
  • 4444.jpg
    4444.jpg
    2.2 MB · Views: 29
OK,

Power supply test loks good!

6.3VAC and 390VDC.

I was mounting the power supply board and discovered I was missing (4) of the 8/32 x 3/8 screws....had enough washers nut missing 4 of these only had one in the kit package?

Ran ut to Lowes again and found out they mostly only have down to 1/2" 8/32...but had some 3/8" stainless with allen cap....got these and they worked just fine.

Ok continuing on with the wiring....

Alex
 
Got thru the stepped attenuators and some more of the wiring.....done for today the lights gone!! lol.


Attachments

  • 1111.jpg
    1111.jpg
    2.2 MB · Views: 29
Ok...

All of th board wiring is complete...will install the boards tomorrow morning....then wait for the resistors to arrive and then we should be ready for the
resistance check and first power on!!!

Getting excited, fingers crossed, and no "smoke"!!..lol

Alex


Attachments

  • 9999.jpg
    9999.jpg
    871.4 KB · Views: 38
Just a sanity check...

The 6C45Pi tube socket wiring:

On A1 there are no wires attached to pins 1,3,9
On C3 there are no wires attached to pins 3,6,9

This is correct I assume because 1,3,6,9 are in commom connections for the cathode so your picking the one on each tube that allows for the most direct route etc?

Just checking!

Alex
 
Looking really nice! My kit arrives Thursday. I will likely get the top plate powder coated, so a delay for building it for me.

I've never used Tung Oil Finish, but I have used Poly Wipe. Have you used both? How many coats of Tung Oil will you use?
 
Hi Allan,

I have 4 coats on now, just did the 4th coat an hour ago..it takes 24hrs to dry to use Very Fine steel wool to sand down for the next coat..I was thinking of 4-5 coats.

I will take a good look at it tomorrow in the daylight. It looks very nice right now so this may be it.

I use Formby's Tung Oil, High Gloss, a small pint can, more than enough to do several wood bases.

Its really very, very easy to do compared to other staining I have done....simple 220 at first, then 320 then the first coat...wait 24hrs, steel wool, second coat...repeat until your happy.

Going to mount the boards tomorrow and then wait for the resistors 49.9 ohms and resitance check then power on!

I have taken my time...started last Monday and have worked on it for 4-6 hours a day.


Measured all the parts for values, resistors and caps, measure, cut, strip install!! over and over and over! Ha!! I never thought I would stop wiring.

So far the kit goes together well and if you read the steps a few times its pretty straight forward..but you can get confused if you rush.

Hoping this thing plays the first time!

Good luck on your build.

Alex
 
  Good luck Alex.  I want the wood to be a little darker. Went to Lowe's and looked around, and found spray poly with stain in it. I bought the Pecan shade in satin, they had gloss also. Sanded 220, and 320, and sprayed. Didn't darken it much. But it says on the can not to expect muck color on the first coat, and to let the first coat dry for 24 hrs. to seal the wood. Then the next coats should darken a little more. We will see.
  Oh, I got my power cord kit and my two resistors today. You should have yours in no time.
 
Back
Top