Love My Crack!

Atraf

New member
Hello everyone, It is my first DIY project and I wanted to share my result.
Finished building the basic Crack 3 months ago, over time I added the Speedball, waxed the wood and added the spiked feet.
I must say the building process was as much fun as the listening part itself, enjoyed every moment.
Already thinking about my next upgrade, probably Dale/Alps + new knob (still haven't find the one).
I started with the Crack only and try to do my best postponing the Speedball installation so I can really tell difference between with and without, my goal was a month I gave up after two weeks, after a while I bought the schiit modi which really made the crack shine.
The combination with my HD650 is a amazing, a pair from heaven :)

W4BTn3.jpg

f9hGWE.jpg

EPPq5E.jpg

pSy76L.jpg

kppIaw.jpg

WrBRST.jpg


Last 2 photos are before Speedball, spikes, and waxing the wood.

hOUQ6t.jpg

bxb10G.jpg


Really nice build. The wood base looks absolutely elegant.

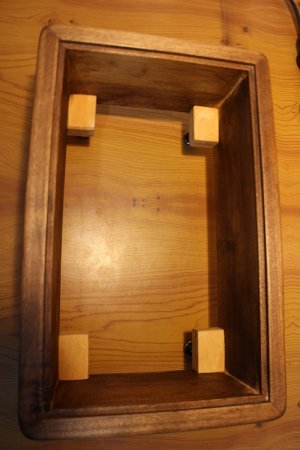
How did you attached the spikes to the base? It looks like they are slight recessed.
 
Thank you everyone,
In order not to damage the wood base and to make the connection of the spikes less visible I glued 4 "cubes" of wood to the bottom and attached the spiked to them.
 

Attachments

  • IMG_0462.JPG
    IMG_0462.JPG
    132.1 KB · Views: 418
denti alligator said:
Where'd you get those spikes?
http://www.daytonaudio.com/index.php/dss3-bc-black-chrome-spike-set-4-pcs.html


By the way, I am about to order a new volume pot, I want to buy the alps pot blue velvet,  is this the one I need?
http://thlaudio.com/alpsmne.htm ( the first one on that page )
RK27112A Single shaft, dual units(stereo) 100k

I also read there are a lot of fakes, how can I tell if this one is a fake or not ? the price is 18$.

 
Yep, that's the one.

Here is a link to the prior discussion on the forum: http://bottlehead.com/smf/index.php?topic=3456.0
 
I have used a router to round the top edge and corners on several Bottlehead builds.  But I didn't think to round the bottom edge. 

I like it! 
 
Hi, I'm in love with your crack and want to build a clone.
Saw it on Massdrop and was trying to figure how to contact you.
Fortunately found you here.
Could you help me with some queries?
1. What wax did you use, where to buy it?
2. Spikes: cannot buy on dayton audio website, how to get them.
3. How did u round the edges?
4. Mine is built already so how to paint the metal and bell?
Thank you
 
Yeah, I think I will router  (1/4" or 1/8" bit)  all sides myself when I get to buyin and buildin...  It looks elegant that way.... And yes, I too, would like to know your finish methods, really like the elegant finish on it....
 
mark93 said:
4. Mine is built already so how to paint the metal and bell?
This question comes up a lot.  It may be more difficult to remove, paint, and reinstall the transformer cover properly than it is to build the kit in the first place.

A better idea is to take a large scrap piece of cardboard, use box knife to cut a rectangular hole into the cardboard that is the size of the transformer cover, slip it over your current transformer, then paint both the cover and screws.

If you're going for a bright color, it can be pretty easy to slide a little painter's tape under the cover and over the cardboard to keep that paint off the lamination stack.

-PB
 
In reply to PBs cardboard cover of the transformer bell I have painted all of my 6 BH top plates and hardware after assembly and before wiring.
I simply use blue painter's masking tape on the transformer laminations and every thing I do not want to paint (tube sockets, switches, RCA jacks, volume and selector switchshafts, power supply sockets, etc.).  It takes a little time - use a razor knife to work the small parts.
 
Back
Top