The LEDs provide the correct bias voltage for the 12AU7 which also influences the operation of the 6080. Your amp currently isn't working and shouldn't be used until this issue is remedied.
You are using an out of date browser. It may not display this or other websites correctly.
You should upgrade or use an alternative browser.
You should upgrade or use an alternative browser.
Led not lit and no output sound.
- Thread starter Hilts
- Start date
https://www.mouser.co.uk/ProductDetail/Broadcom-Avago/HLMP-6000?qs=sGAEpiMZZMt82OzCyDsLFG14VY5EtHXv%2FT3fszwBz5E%3DHilts said:Would it be possible to source the 9 pin socket and led's from the UK?
https://www.hotroxuk.com/9-pinb-9-pin-miniature-valve-socket.html
Mouser is plenty reliable, but I can't vouch for the socket supplier.
If you remove the LED connected to A3, does the resistance value there change?Hilts said:I my just try and replace the led first and see if that works.
Paul Birkeland said:If you remove the LED connected to A3, does the resistance value there change?
Right Paul. I've removed the LED from A3 and the resistance between A3 and terminal 3 goes to O/L which is the same as A8.
I also tried the battery tip that Drew1D mentioned on another LED thread.
"I would take like a AA battery, and clip or tape a wire to each side of it. Now, with those two wires, touch the positive side (the nipple side) to the pin of the socket, and the negative side to the center of the socket, did it light up? Do the same to the other LED"
A3 LED would not light up but A8 did light up.
Does this mean the LED is knackered?
You can install a jumper between A3 and A8 to restore operation to the amp till you obtain a replacement LED.
Nothing you've done will cause the 12AU7 not to light up. You can put the wire back on pin 8 of the power transformer if you'd like.
If the 12AU7 doesn't glow but the 6080 does, you have a loose wire at B7, B8, or A9 (maybe more than one of those terminals).
If the 12AU7 doesn't glow but the 6080 does, you have a loose wire at B7, B8, or A9 (maybe more than one of those terminals).
Drew1d
New member
Y’know it’s kinda funny. Most guitar amps I work on, if I wanted to elevate the filament heaters (the glow-y thingees in the tube, attach to a low voltage source as reference to ground,to get rid of some noise) I would attach a resister like 100 ohms from each heater wire and attach it to the cathode to the power tubes.
Kinda like you did, by attaching the cathode (pin 3) to the heater (pin 4) but you didn’t have a resistor. I guess that could have fried the LED I’m not sure.
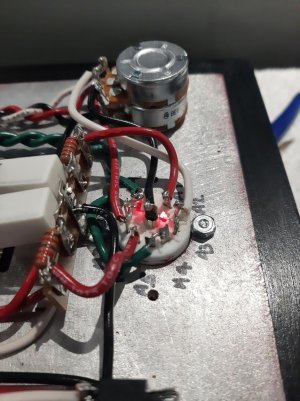
Please take this with the love that’s intended but I would start with your solder technique. To me it looks like your iron isn’t hot enough, and on many of the joints you don’t have enough solder.
Let’s start with the iron. Crank that sucker to 700f. (I don’t know Celsius) If your tip is small, and the iron came with a larger one, use the larger. It should be wider than a pin on a socket, but not big enough to touch multiple pins at once.
The reason you would want a larger tip is it cools down when you touch things. A bigger tip retains heat better. I change mine based on what I’m soldering. You don’t need to do that, just use a bigger one.
Next, the thing I like to do is make sure solder fills the whole pin, but doesn’t drip down.
- I make a little hook (half loop) in the end of the component, go through the pin and have the other side being “pulled†firm by an alligator clip wire or helping hands.
- tin the end of the soldering iron with a dab of solder. This is to increase contact heat to the parts, not smear like glue.
- touch iron on one side of the pin, and “paint†the opposite side pin and (hook)wire with solder. Do not push the solder into the iron, sure it melts, but you need the components hot. “Where the heat go, your solder flowâ€.
- you should lift the solder iron away in like 2-3 seconds, like 5 at the most. If it isn’t working, chances are it’s not hot enough.
- when I had a small bad iron, I could “get away with†using a small bottle of liquid flux and wetting the area before soldering. But it does leave residue you have to clean when finished. You could also try “cleaning†up the area to be soldered by taking some super high grit sand paper and scuffing it up a little.
But everyone develops their own techniques, and mine aren’t “right†per se. just remember, if you ever get lost in the woods, just start talking about soldering, and someone will pop out and tell you why you’re doing it wrong.
Kinda like you did, by attaching the cathode (pin 3) to the heater (pin 4) but you didn’t have a resistor. I guess that could have fried the LED I’m not sure.
Please take this with the love that’s intended but I would start with your solder technique. To me it looks like your iron isn’t hot enough, and on many of the joints you don’t have enough solder.
Let’s start with the iron. Crank that sucker to 700f. (I don’t know Celsius) If your tip is small, and the iron came with a larger one, use the larger. It should be wider than a pin on a socket, but not big enough to touch multiple pins at once.
The reason you would want a larger tip is it cools down when you touch things. A bigger tip retains heat better. I change mine based on what I’m soldering. You don’t need to do that, just use a bigger one.
Next, the thing I like to do is make sure solder fills the whole pin, but doesn’t drip down.
- I make a little hook (half loop) in the end of the component, go through the pin and have the other side being “pulled†firm by an alligator clip wire or helping hands.
- tin the end of the soldering iron with a dab of solder. This is to increase contact heat to the parts, not smear like glue.
- touch iron on one side of the pin, and “paint†the opposite side pin and (hook)wire with solder. Do not push the solder into the iron, sure it melts, but you need the components hot. “Where the heat go, your solder flowâ€.
- you should lift the solder iron away in like 2-3 seconds, like 5 at the most. If it isn’t working, chances are it’s not hot enough.
- when I had a small bad iron, I could “get away with†using a small bottle of liquid flux and wetting the area before soldering. But it does leave residue you have to clean when finished. You could also try “cleaning†up the area to be soldered by taking some super high grit sand paper and scuffing it up a little.
But everyone develops their own techniques, and mine aren’t “right†per se. just remember, if you ever get lost in the woods, just start talking about soldering, and someone will pop out and tell you why you’re doing it wrong.
Drew1d
New member
If everything checks out, and it’s working, that’s a tough call. I’d probably run it for a while, get some enjoyment out of it, but would ultimately reflow the joints.
Pace worldwide has a video on the internet from the 80s about soldering. That was the turning point for me. Also I bought one of their expensive solder stations, and it changed everything. I’m not suggesting you buy it, when realistically you just need something like it for an hour to reflow the joints.
There are less expensive irons that are good, for sure. I know I keep bringing up guitar amps ad nauseum, but if you could make friends at the local guitar/amp repair guy near you, show him the Crack, and ask for advice…. Maybe He/she could give a few pointers…. I would probably not lead with, can I borrow your stuff.
There are technical schools near me called BOCES and I know they have the stuff. Perhaps call a place like that, or ask to speak with the instructor for info.
Ideally if you had a friend in hifi near you.
The problem with everything I m saying is that it’s either a lot of time or money. I would watch the first Pace video, and see if you can make it work with what you have. Maybe it’s just an adjustment to the tool or technique.
Similar threads
- Replies
- 5
- Views
- 285
- Replies
- 3
- Views
- 2K
- Replies
- 8
- Views
- 464