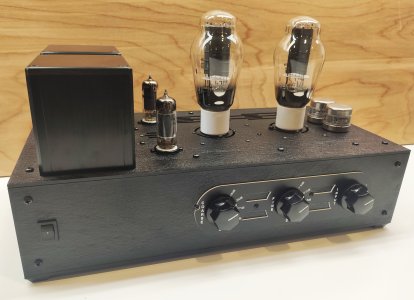
Eons ago (August), I put in an order for the chassis and input transformers for a super customized BeePre, and the input transformers finally showed up! This particular customer wanted two balanced inputs as well as balanced outputs, so I had to use an 8P3T switch in order to switch each set of XLR jacks into the input transformers, then to either switch between the input transformers or the one set of unbalanced input jacks. I made this similar in size to one of the BeePre 2 prototypes I made some years ago and powder coated it black, then installed MonAmour transformer covers over the power transformers.
You are using an out of date browser. It may not display this or other websites correctly.
You should upgrade or use an alternative browser.
You should upgrade or use an alternative browser.
Kit Assembly Gallery
- Thread starter Paul Birkeland
- Start date
I couldn't quite talk him into the remote like yours has.
")
Thermioniclife
Member
Another sweet Design. Hey PB I'm considering one of those Khozmo series motorized attenuators. Did you bother to measure the quiescent and operational current of this unit, if so can you expound?
And also what are your thoughts regarding this unit in general?
Thanks,
Lee
And also what are your thoughts regarding this unit in general?
Thanks,
Lee
The Khozmo didn't seem to draw much as far as I can remember. I did run it on a bench supply to see what it wanted in terms of minimum voltage and to be sure the motor wasn't pulling a ton of current. Arek will answer your questions if you send him an e-mail (be sure to mention that I sent you, as I bug him a lot!).
At its essence, this is functionally identical to a BeePre 2 with all the upgrades, and swapping it out for Doc B's BeePre 2, the differences were nice and subtle, as they should be!
At its essence, this is functionally identical to a BeePre 2 with all the upgrades, and swapping it out for Doc B's BeePre 2, the differences were nice and subtle, as they should be!
Thermioniclife
Member
Thanks PB, It looks like a quality unit. The only thing that scares me is the un-godly length. I scaled it using your photo as best I could
and I make it at between 5.375-5.5 inches in length. I have an upcoming project that I would like to use one of these.
I will contact Arek for the details. As always PB Thank you.
Regards,
Lee
and I make it at between 5.375-5.5 inches in length. I have an upcoming project that I would like to use one of these.
I will contact Arek for the details. As always PB Thank you.
Regards,
Lee
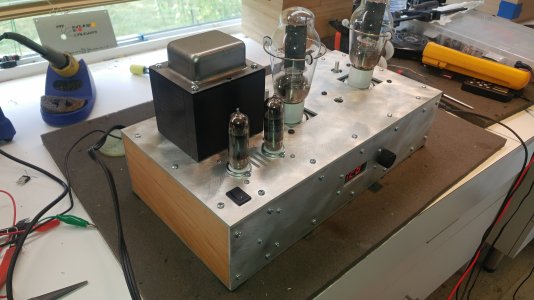
Yeah, that sucker is really deep. I added a standoff to support the top plate right behind it, but also considered the possibility that I would need to physically attach the attenuator back there if it didn't feel stable.
D
Deke609
Guest
@PB and anyone else with a motorized volume control - Is there any labelling that indicates the motor manufacturer? I'm trying to figure out a diy way of attaching a 15 deg. step motor to a Seiden rotary switch that also allows for manual switching. No luck yet - it would help if I knew what such a gizmo was called (assuming they exist for retail purchase). Hoping that I'm just not doing the correct search.
cheers and many thanks, Derek
cheers and many thanks, Derek
They are stepper motors.
D
Deke609
Guest
Thanks. I meant the manual override bit. Don't know what that's called.
You can rotate a stepper motor slowly with your hand and it shouldn't cause problems.
D
Deke609
Guest
Many thanks.
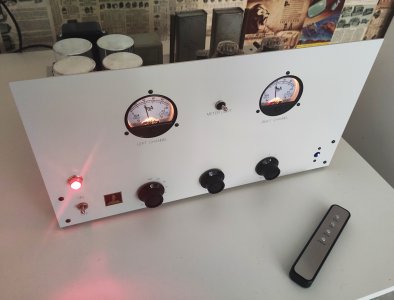
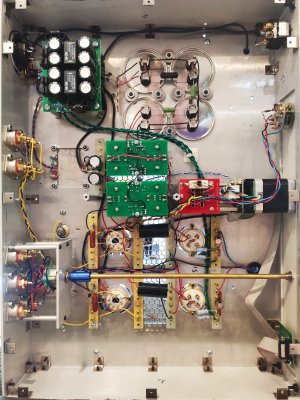
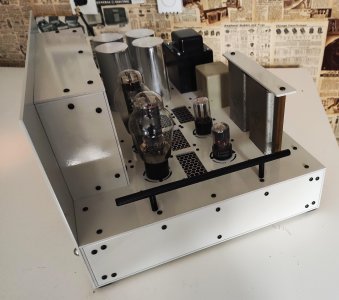
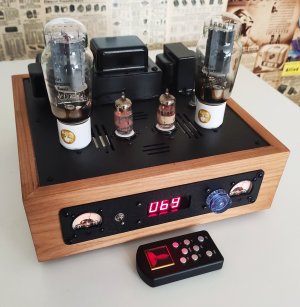
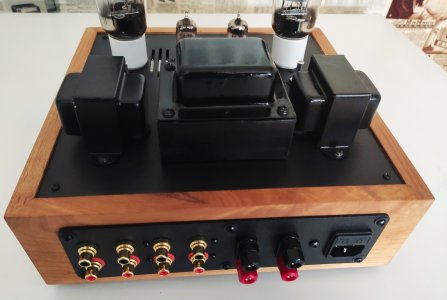
A local customer approached me a while ago about building a kit for him, and we went back and forth for a while before coming to the conclusion that what he really wanted was a fully upgraded Stereomour with a remote control. In order to do this, I had custom top, front, back, and bottom panels made, and I shrunk the top panel to a 10x10 in the process since the controls and jacks all moved off the top panel.
I cut the wood base down and used my scroll saw to remove enough material to get everything tucked in there. It was a very tight fit! Standoffs in the corners and along the side edges hold the top and bottom panels together.
I cut the wood base down and used my scroll saw to remove enough material to get everything tucked in there. It was a very tight fit! Standoffs in the corners and along the side edges hold the top and bottom panels together.
Attachments
Similar threads
- Replies
- 2
- Views
- 199
- Replies
- 0
- Views
- 420
- Replies
- 9
- Views
- 303