You are using an out of date browser. It may not display this or other websites correctly.
You should upgrade or use an alternative browser.
You should upgrade or use an alternative browser.
Idle thumbs, curiosity, thought i'd try some Crack..
- Thread starter mcandmar
- Start date

Grainger49
New member
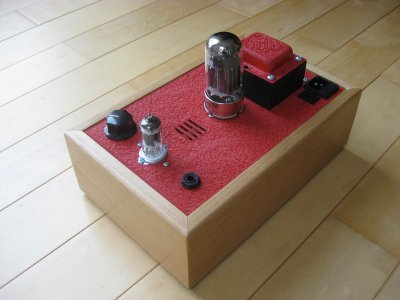
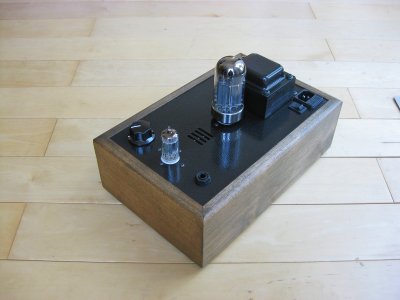
That is a super clean build. Even prettier than the manuals.
I particularly like the wrinkle finish. It came out very well.
I particularly like the wrinkle finish. It came out very well.
Strikkflypilot
New member
Super neat.
Just building another Crack myself now.
No point in posting mine now")
Yours is impeccable.
Just building another Crack myself now.
No point in posting mine now
Yours is impeccable.

Natural Sound
New member
Wrinkle finish is a classic industrial look. The only downside is that it can be tough to keep clean. Lots of nooks and crannies to trap dust and dirt. You might want to drape a towel or something over the top when not in use.
Nice job.
Nice job.

Strikkflypilot
New member
Indeed, looks really good. Great build altogether!
mcandmar
New member
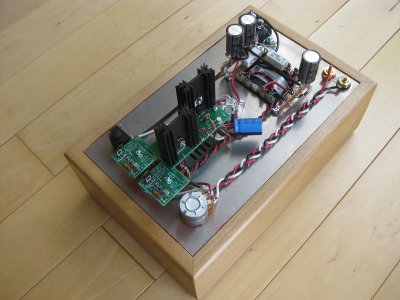
Elbow grease, lots of elbow grease. It was one of those projects that seemed like a good idea at the time but turned out to be highly frustrating.
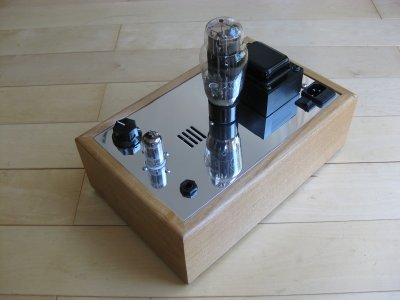
For those interested in polishing a chassis my plate my advice is don't, just don't. It takes forever, it is impossible to get a 100% perfect finish so you will get to the stage where polishing creates micro scratches, which you try and polish out and in turn create even more micro scratches. There is a point where you just need to stop and call it a day before you drive yourself crazy.
That said, the recipe was as follows,
-Sanded flat with 200 grit, then 400, then a wet sand with 1200 to remove the brushed finish and get a flat uniform texture.
-Buff with a cloth wheel in a drill using metal polish. I used Autosol metal polish for this one.
Things not to do,
-Clear coat, i tried a couple of different types and none would stick properly to the finish which meant i had to scrape them off and rebuff.
-Dual Action sander with Wool pads, works great for car paintwork, but leaves lots of tiny micro swirls which could only be removed by a rebuff with the cloth wheel.
-Wipe the finish with a rough cloth, or when covered in lot of dust as you will only add more micro scrapes into the finish.
Apart from that i think it looks amazing ;D
Attachments


mcandmar
New member
This is the fourth one, but i am fairly sure there are others who have built more. Not looking at anybody in particular :
For the wood base i used a few coats of Danish oil finished with wood wax. It came out a little darker and yellow than i would have liked, but it really comes alive in direct sunlight. I am thinking about trying different oils in future and see if i can get closer to a natural finish.
For the wood base i used a few coats of Danish oil finished with wood wax. It came out a little darker and yellow than i would have liked, but it really comes alive in direct sunlight. I am thinking about trying different oils in future and see if i can get closer to a natural finish.
My experience has been that any oil finish will enhance the grain to some degree. The finish I have found to keep the wood color as close as possible to the unfinished color is a water based clear finish like satin Varathane. Since there is no oil it dries, uh, dry, and doesn't give the wood a slightly yellow, wet look that makes the grain pop.
I used that finish for years but I have since decided I like to pop up the grain a little and use an oil based gunstock finish these days.
I used that finish for years but I have since decided I like to pop up the grain a little and use an oil based gunstock finish these days.
mcandmar
New member
Doc B. said:My experience has been that any oil finish will enhance the grain to some degree. The finish I have found to keep the wood color as close as possible to the unfinished color is a water based clear finish like satin Varathane. Since there is no oil it dries, uh, dry, and doesn't give the wood a slightly yellow, wet look that makes the grain pop.
I used that finish for years but I have since decided I like to pop up the grain a little and use an oil based gunstock finish these days.
Thanks Doc, i don't think we get the Varathane brand here but i will seek out some water based clear and give it a try. Here is question for you, what is the difference if any with gunstock oil vs regular wood oil? Reason i ask is i will need to tidy up a gun stock in the near future and wondering what is best to use.
I imagine the difference between gunstock oil and other oils is mostly branding and probably something to do with the relative proportion of linseed oil, tung oil, solvent, etc. I like the Tru Oil because it goes on easily and dries relatively quickly. It builds to a nice glossy finish in about three coats and then buffs to a very nice sheen with 0000 steel wool.
Clark Blumenstein uses Tried and True linseed oil, which makes for the really gorgeous matte finish on his speakers. He sells a compete (re)finishing kit on his website.
http://www.blumensteinaudio.com/all-products/cabinet-touch-up-kit
Clark Blumenstein uses Tried and True linseed oil, which makes for the really gorgeous matte finish on his speakers. He sells a compete (re)finishing kit on his website.
http://www.blumensteinaudio.com/all-products/cabinet-touch-up-kit
Natural Sound
New member
mcandmar said:This is the fourth one, but i am fairly sure there are others who have built more.
I think they have a 12 step program for that.
")
Similar threads
- Replies
- 0
- Views
- 11K