You are using an out of date browser. It may not display this or other websites correctly.
You should upgrade or use an alternative browser.
You should upgrade or use an alternative browser.
Capacitor p0rn
- Thread starter adamct
- Start date
300uf caps will work well, provided they have at least a 250V rating.
I think WINE should run PSUD on your Mac.
-PB
I think WINE should run PSUD on your Mac.
-PB
fullheadofnothing
Moderator
Caucasian Blackplate said:I think WINE should run PSUD on your Mac.
HA! I've infected your brain, Peebs!
And yes, it will run under WINE.
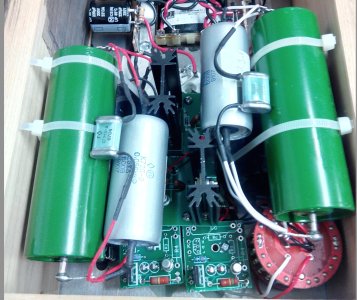
Still waiting for the power supply SCR PA22000 MKP cap, but as expected with the simulation, the 1st part was fitted without any surprise. I just had to drill one of the SP card to make the appropriate room for the Valab 23 100k log. stepped attenuator
(One of the) next steps :
- try to reuse some unused SB tracks and holes to hold the leds for my 7119 PQ modification
- implement the SB resistor hack to optimize my different input tubes
- machine a delrin part to hold the C7X shoke and the PS cap
and the case will be full 8)
The new output cap are a significant upgrade over the electrolytics. Need to listen more music and find the appropriate english words ;D to qualify the change, but a lot more presence, transparency and sweetness are a good start of approximation.
And my 7802WB, my SN6WGTA, my VT231 doesn't make their huge hum. Probably no need for the grid stopper mod output tube anymore.
Attachments
Strikkflypilot
New member
That is an impressive fit!
I see You have drilled the small SB B PCB. Did You drill with increasingly big bits or just go ahead with the right size for the # 4 screw?
I see You have drilled the small SB B PCB. Did You drill with increasingly big bits or just go ahead with the right size for the # 4 screw?
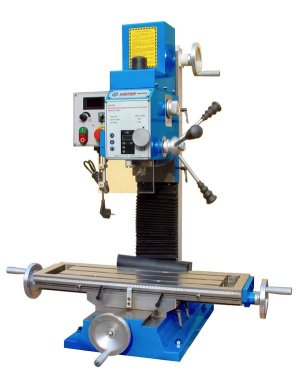
I've drilled directly to the required size (as I did for the Valab 23 in the soft aluminium), just putting hard foam under the board to prevent flexion and clamping it by hand while descending. I know that's probably overkill 8) for such a task, but I have the chance to possess a mill with precision moves on all 3 axis, thats very very helpfull to center the bit. Very low force is needed to drill the pcb.
Attachments
Strikkflypilot
New member
Put me up for one too!... ")
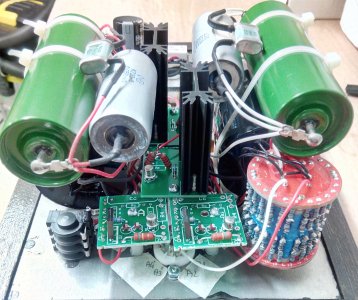
After solidworks theory to validate the choice and placement of components (post #96), now place to the construction.
Here are the power supply modifications :
- a SCR PA22000 250 V 220μF to replace the last 220μF capacitor on the power supply
- a C7-X shoke to replace the last 270ohm resistor
input stage modifications :
- Valab 23 stepped attenuator 100k log. The right small speedball board need to be redrilled 5mm away. The top plate needs a larger hole too.
- switchable resistor R1 mod to optimize plate operation voltage for my 12BH7A's
- replacement of the LMJE350 by MJE5731 on the 2 small speedball boards.
- switchable rewiring to accept 7119/5687 input tube (see Modifications to run e80cc/12bh7a/5687 for Crack+Speedball thread http://bottlehead.com/smf/index.php/topic,5989.135.html)
output stage modifications :
- 2 x 220R grid stopper resistor needed by 7802WB before capacitor upgrade
- two JB JFX 100μF 250V to replace the output electrolytic capacitors
- bypassed by two russian K75-10 Paper In Oil 4.7μF 250V
- bypassed by two russian K72P6 Teflon 56nF 500V
- bypassed by two russian SGM Mica 1nf 350V
Enjoy, it's definitely the word !
Of the two major modifications, replacing the electrolytic output caps made a improvement on the audio message. More transparency, room on the live recordings, more air and reverberation sensation, micro details emerge like spectator voices. This transparency enhances the voices and instrument message, especially on drums. A veil has clearly been removed making the tube differentiate and letting me appreciate jazz even more.
Difficult to say which components achieve most of the work as I installed them almost at the same time, but considering the low upgrade cost, it's definitely been a good move.
The second major modification is about the plate voltage of my favorite tube so far, a GE 12BH7A wide black plate. Now running at the appropriate voltage, the tube is able to offer an absolutely greatly improved soundstage. Everything seems more focused. I've been surprised on a record by a beat making me think someone was on my left !
I'm now anxiously waiting for my 7119 as it seems to go even beyond the 12BH7A.
So far, my hot combinations are VT231/6SN7GT-6H13C/6AS7G for vocals and jazz, and 12BH7A-7802WB for more dynamic music.
Most of the difficulties putting this together were rather on the 9 pins socket than on the speedball boards.
EarWorm
New member
I'm using Claritycap TC 300uF's in the power supply. Claritycap says they have an ESR of 1.1 mΩ which seems to be quite low.
I'm wondering now if using a bypass cap of any sort on the last cap will increase the low ESR of the Claritycap TC 300.
Don't want to hinder the speed of the last cap particularly when it was designed for speed.
I'm wondering now if using a bypass cap of any sort on the last cap will increase the low ESR of the Claritycap TC 300.
Don't want to hinder the speed of the last cap particularly when it was designed for speed.
mcandmar
New member
Ooooh right. Looking at that page the 300uf cap is 1.1 mΩ, not 1.1 Ω as i assumed. vs ~500 mΩ for the Panasonic Lytics so those figures make a lot more sense for a poly cap with very low ESR.
P.S. Solen list ESR specs too https://www.solen.ca/pub/index.php?pageNum_cms_catalogue=3&catalog=show&s1=2&s2=3&s3=&niveau1=1&niveau2=3&niveau3=26&origniveau=%2Fpub%2Findex.php%3Fcatalog%3D3%26niveau1%3D1%26niveau2%3D3%26s1%3D2%26s2%3D3&totalRows_cms_catalogue=65&niveau1=1&niveau2=3&niveau3=26&niveau4=&totalRows_cms_catalogue=65&niveau1=1&niveau2=3&niveau3=26&niveau4=&totalRows_cms_catalogue=65&niveau1=1&niveau2=3&niveau3=26&niveau4= 300uf cap rated at 1 mΩ
P.S. Solen list ESR specs too https://www.solen.ca/pub/index.php?pageNum_cms_catalogue=3&catalog=show&s1=2&s2=3&s3=&niveau1=1&niveau2=3&niveau3=26&origniveau=%2Fpub%2Findex.php%3Fcatalog%3D3%26niveau1%3D1%26niveau2%3D3%26s1%3D2%26s2%3D3&totalRows_cms_catalogue=65&niveau1=1&niveau2=3&niveau3=26&niveau4=&totalRows_cms_catalogue=65&niveau1=1&niveau2=3&niveau3=26&niveau4=&totalRows_cms_catalogue=65&niveau1=1&niveau2=3&niveau3=26&niveau4= 300uf cap rated at 1 mΩ
Similar threads
- Replies
- 9
- Views
- 327
- Replies
- 13
- Views
- 3K