Beepre 2 Coarse Attenuator resistance measurement [resolved]

denteom

New member
I've completed the build up to the resistors connecting on the coarse rotary switch. When I checked the resistance from Q10 to Terminal (1) I got a correct value of 5K ohm.  But testing Q10 to (7) Terminal I got a 0 Kohm value. Not sure how to correct this problem. As of my last checking, I think I don't have a cold soldered joint. Where do start to trouble shoot?
Dennis
 
I would very, very, very strongly suggest posting photos of your wiring before attempting any reflowing of solder joints or anything like that.  A problem like this is either a miswire that needs to be corrected or a measuring issue with the meter (unlikely since you got the correct measurement on one side).

It's completely possible that there's an issue with one side of the fine attenuator that's actually causing this problem.

If you attempt to reflow your solder joints to get this issue to go away, more than likely you'll melt one of the attenuator switches.
 
Hope these photos help
 

Attachments

  • PXL_20221211_030340006.jpg
    PXL_20221211_030340006.jpg
    494.5 KB · Views: 20
  • PXL_20221211_030435521.jpg
    PXL_20221211_030435521.jpg
    810.1 KB · Views: 11
  • PXL_20221211_030539363.jpg
    PXL_20221211_030539363.jpg
    442 KB · Views: 16
Hi What you mean by Ok or OL?

My multi- tester is still an analog meter, I just see the needle move to a corresponding value, which is I set to the Ohmeter multiplier either times 1, times 100, times 1000, amplifying it to get a more accurate reading. The old analog meters once switch to ohmeter need to be  zeroed each time. When I tested Terminal one it went up to 5 kohm. But when I checked Terminal 7 it was closer to 0.

When I reviewed the photos I took I noticed that the white wire connected to the lower lug between 7 and 8 has kinda some abrasions on it. I think that was caused by yanking it out from the old volume control? If the wire is damaged from inside can that cause the problem as well?
 
The OL vs 0K is a common issue people have with digital meters.

Having 0 ohms on an analog meter means that something is touching which shouldn't be, so not a broken wire unless the wire has broken and is resting against the chassis.

Is the solder on Q7 touching the nut for the switch by chance?  If it is, you could side cutters to just trim away a little solder so they aren't touching any longer.
 
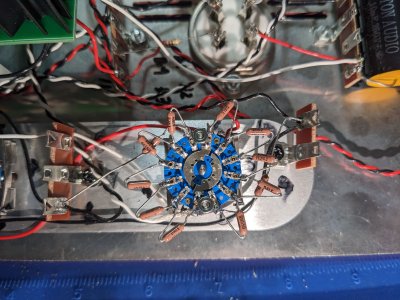
Having a hard time finding the short circuit issue.  I trimmed most of the protruding wire, but still the same problem. Used a magnifying glass to see if Terminal 7 was in anyway touching the screw beside it and it did not show any part touching it. I measured the lower lug between terminal 7 and terminal 8 which also showed it was also 0. So I thought maybe this was causing it, Tried to remove the wire, but because I crimped it before I had a hard time removing it.  I just stopped and will ask a friend with better skills than me to remove it.

Just a quick observation, the lower lug is still stuck but almost out, I measured Terminal 7 again and somehow it became 5 Kohm, it was a sigh of relief.  Unfortunately after few minutes I measure Terminal 7 again and it is again at 0.  Not really sure what's causing the short.  I already turned the aluminum chassis upside down and tapped into it thinking maybe something stuck in between but nothing fell out. Terminal 8 to twelve also looks fine though.  Can it be a problem of other terminals?

 
What DC resistance do you get at coarse terminal 8?

Does the 0 ohms at terminal 7 change if you change the switch position of the coarse attenuator?
 
The reading on 7 shouldn't change if you turn the knob, but if it does, that could offer an explanation for what's going on as well.
 
Hi, What's the best way turning the switch. When it was not fixed to the chassis it was an easy turn, I think because I was turning the underside and not the Stainless steel shaft. Tried using pliers with cloth or rubber wrapped around it, it either it won't budge or it was slipping. Don't want to bite on too hard using the pliers might damage the pristine smoothness of the shaft
 
When I turned the knob to 7 the reading on 7 is 0 while on 8 is 2 kohm. It has not change same when the knob was on 1, reading on 7 is 0 while on 8 is 2 kohm
 
That terminal pretty much has to be touching the screw or hardware under the screw.  You may need to take a tiny flathead jewelers screwdriver to scrape away the short.
 
Sorry did not see it was on page 2 of the thread. I will try to see if there are any other points touching it. even with magnifying glasses I could not see it.  Maybe peering it the morning light would be better.
 
You can unscrew the plate where the attenuator controls mount and space it off the standoffs with a little cardboard so there's no metal contacting the chassis to verify that the 0 ohm problem goes away.
 
Back
Top