stereomour power supply point to point

ee

New member
Just curious if there is a photo of the Stereomour power supply board converted to point to point. I've resoldered the ps board many times and it's still good but probably at most one more time maybe none. I sometimes read pictures better than words. I am working on reading schematic then drawing it on paper like I'd be doing live and compare it to the board. This is good for learning for sure also. I'm just not convinced I've got it yet.
Thanks
Eric
 
There's a very slight chance that we might have one or two extra Stereomour power supply boards in reserve for repairs. 

If you wanted to wire a new power supply, the tougher issue will be where all the parts can fit on the chassis!

-PB
 
Yes Queen Eileen helped me out with a new board. Thanks!
Today I did do the most fun thing though which was to successfully wire point to point for the power supply. Maybe not much of a stretch for some but it is sweet to have done it. Took me to a new level of enjoyment.
Thanks
Eric
 
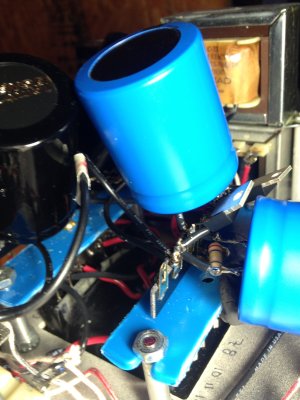
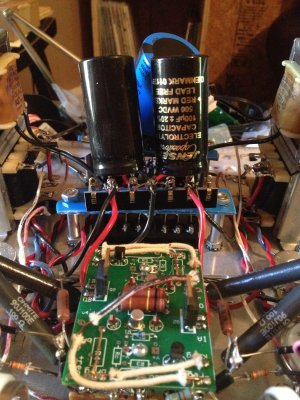
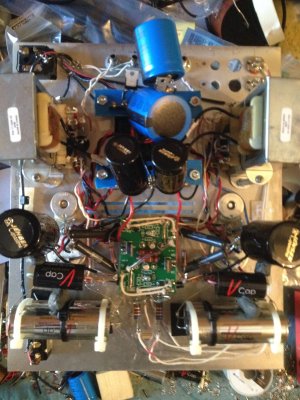
This is looking from the back right corner when flipped over. 7 tag terminal strip mounted to a blue plastic electrical cover cut to size with heavy scissors. The extra hole just below the beige 270k resistor was made because of the nut/bolt holding tag board to plastic strip being to close to transformer terminals below. I would have used nylon nut/bolt perhaps if I redo it.
 

Attachments

  • june 2016 004.JPG
    june 2016 004.JPG
    1.8 MB · Views: 119
  • jun 2016 042.JPG
    jun 2016 042.JPG
    1.9 MB · Views: 124
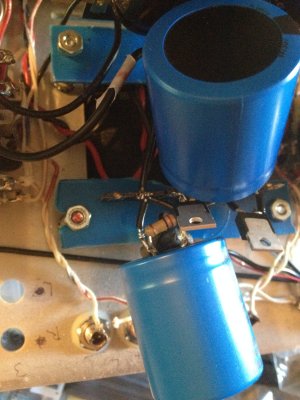
Looking down. The black wire coming out from below the jensen cap with white lettering Carol is from the return at the front terminal strip.
 

Attachments

  • june 2016 008.JPG
    june 2016 008.JPG
    1.9 MB · Views: 125
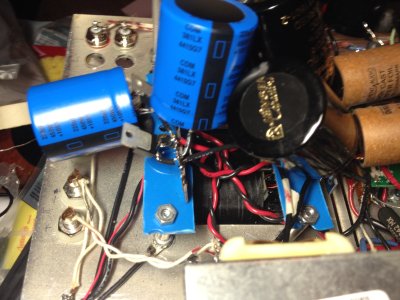
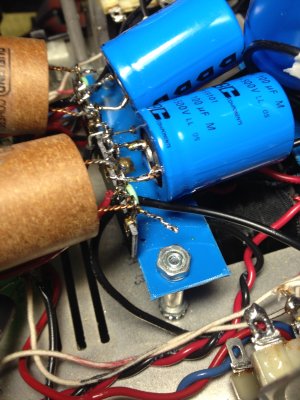
Looking at front 7 tag terminal strip. Ground return in the middle with jumper to strip on right and left for the neg of the electrolytics. Allows easy switching out of caps. Which I already did during this pic taking. Outer 2 lugs each side are jumpered together for same reason and are B+.
2nd pic is a bit more open without the bypasses in.
I  had the Jensen pio electro 100uf then tried 220uf which are in the pics above. This has Vishay electro 100uf. I didn't trim the leads on the Duelunds yet until I decide to leave them. I've tried them in this location with the board but it was so so. With this it is pretty good. I also have  Jupiter copper foil 1uf that I've tried before in this location that I will try again. They are longer though and the Duelunds slide right in thanks to their lead arrangement.
 

Attachments

  • june 2016 011.JPG
    june 2016 011.JPG
    1.9 MB · Views: 108
  • jun 2016 045.JPG
    jun 2016 045.JPG
    1.8 MB · Views: 113
I relocated the cathode bypass caps a few months ago. They are more secure than they appear and I have checked for heat issues but all seems ok.
 

Attachments

  • jun 2016 039.JPG
    jun 2016 039.JPG
    1.9 MB · Views: 139
how about an addendum on how to point to point the power supply and parts , you can even charge us for it!!!!!!!
 
Back
Top